Training Builder Menu
Training Builder is a visual tool that allows VR experience designer to control the logic in the VR experience without the need to write any code.
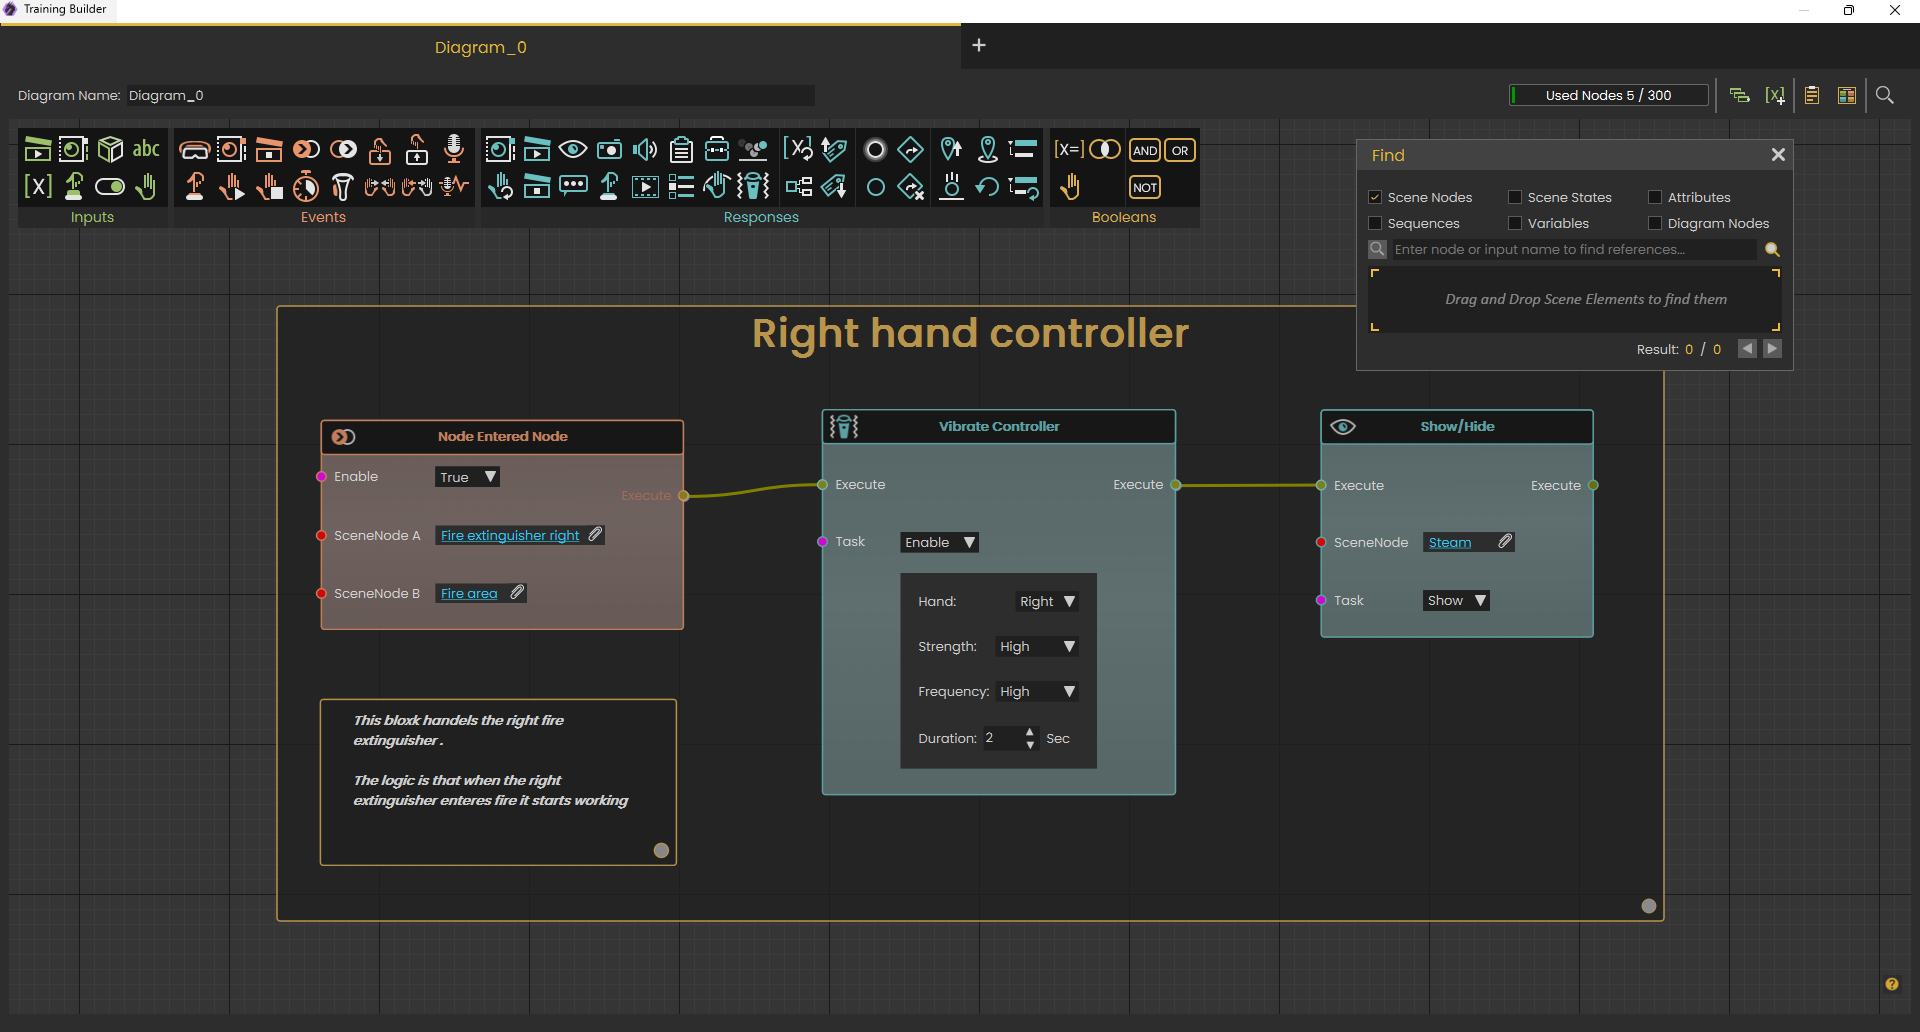
Training Builder allows the user to links Event with Response(s)
An Event is fired when something happens in the experience, for example when the user clicks on a specific object, or when an object collides with another object. A Response is the reaction the VR experience should do when an Event takes place.
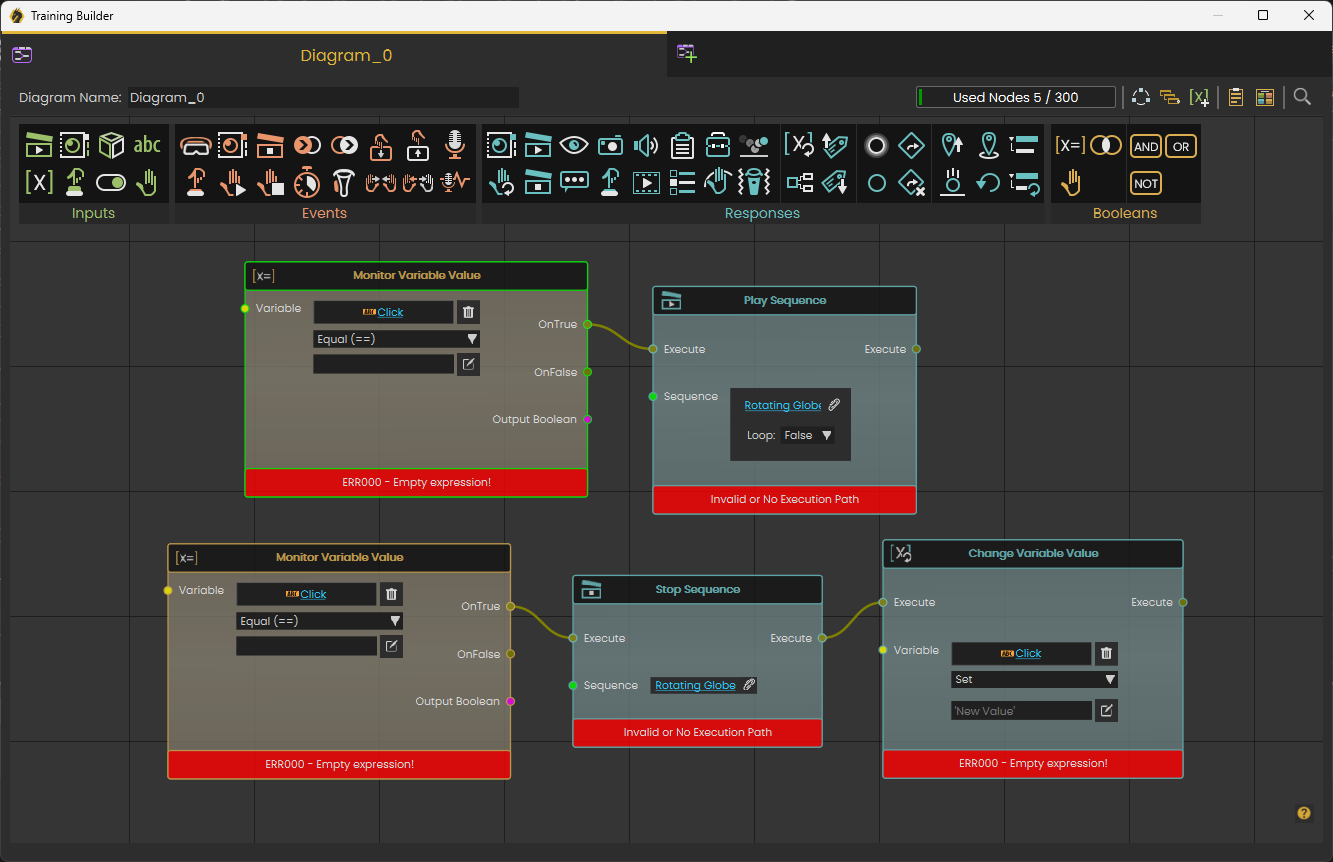
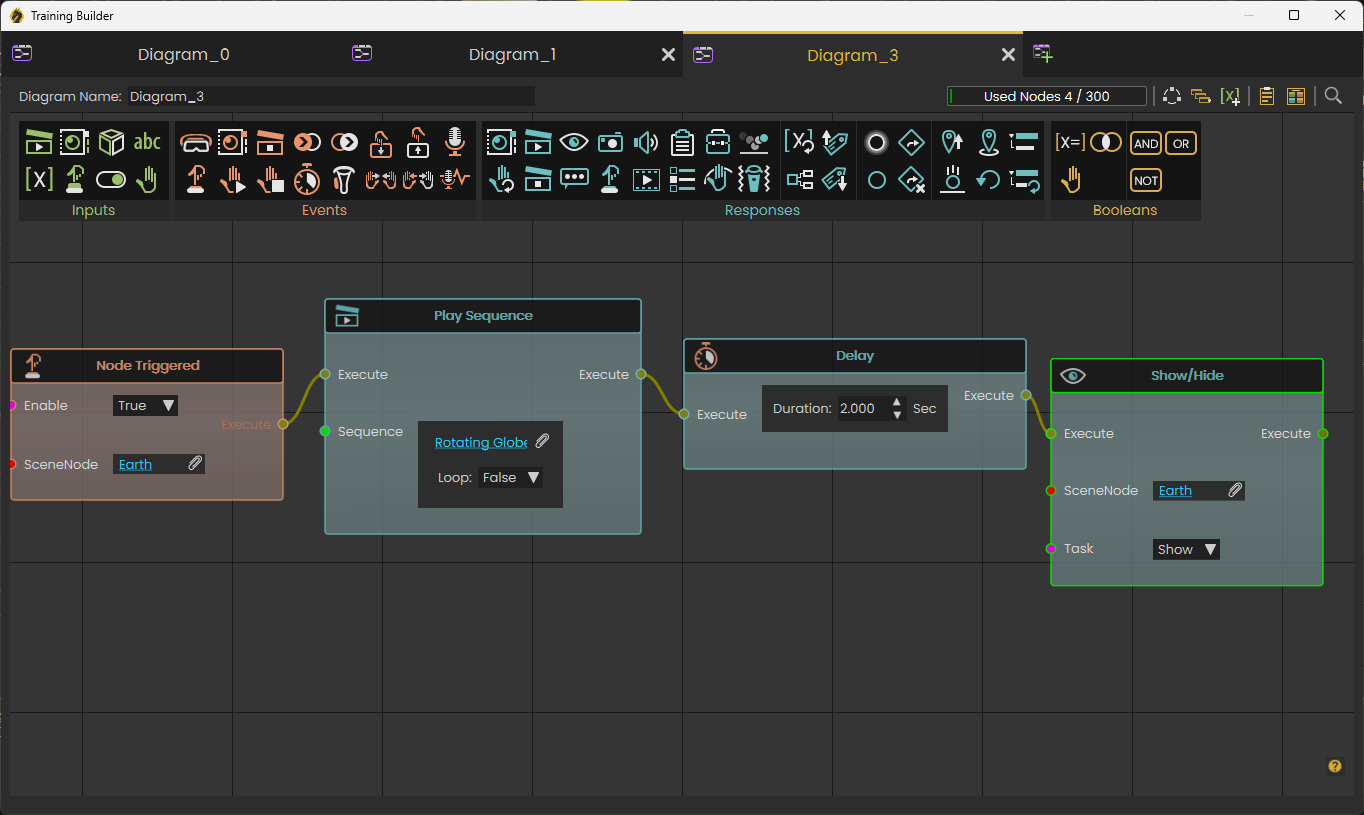
For example when the user clicks on Globe Object (Earth_geo) Scene Node in the Node Triggered Event, it starts the rotation sequence (Play Sequence) Response, as shown in the following image;
There is no limit to the number of elements in Training Builder. The user can add as many elements as needed in diagrams.
Each Diagram can have up to 300 elements to keep things organized for big projects. For small projects one diagram should be enough, for larger projects the user needs to organize work by keeping up to 300 elements in each diagram.
Creating your first VR experience can serve as a good first interaction with the Training Builder to see it in action
The following video provides more details about using Training Builder
SimLab Academy (in the Library panel) under VR Creation includes a section dedicated for Training Builder tutorials.
Variables and Expressions
Using Training Builder, enables users to add variables and use them in creating VR experiences. Check this tutorial about using variables in Training Builder.
Supported variables are of the following types:
String Variable; Stores object names, message data, ..etc
Number Variable; Supports both integer and float numbers. Can be used for calculating , and storing values
Time Variable; can save the time at any stage of the VR experience
String Variables
Initial value can be set to any string in the variable editor in training builder.
When used in Change Variable response, string should be surrounded in single quotations (' ')
Expression supported operations include adding strings, and substring
Number Variables
Initial Value can be set to any float or integer numbers, the following operations are supported for number variables
Increment: Adds one to the current value
Decrement: Subtracts one from the current value
Time Difference: Calculates the different in seconds (up millisecond precision) between two time variables
Expression: large number of expressions are supported, list of supported expressions can be found in the following link , The following tutorial shows how expressions can be used in Training Builder
Time Variables
Initial value for all time variables is set to the start time of the VR experience, at any point of the VR experience the user can capture current time and store it in a time variable
Variable writer
This tool enables the user to track the value of a variable in the VR experience
The value of the variable is updated dynamically, so whenever the variable value changes the variable writer will be updated to show the new value of the variable. Variable Writer is available under the VR Effects Menu.
The user can control its size, and place, so it can be aligned on a wall in the scene or on a monitor, user selects which variable to view, color of the text, and prefix text.
Having multiple Variable Writers belonging to the same group make them have the same font size.
Create/Edit Variables
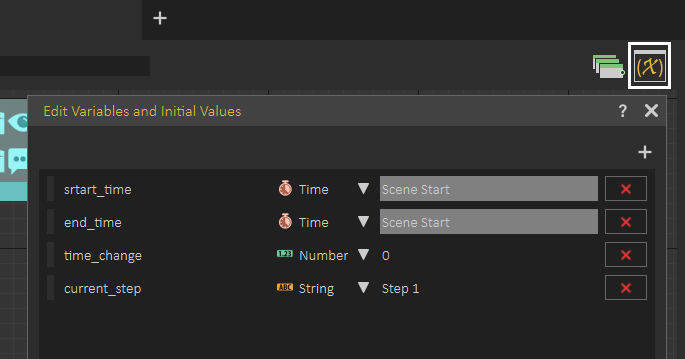
Variables can be created and edited by clicking the Edit Variables button ay the top right part of the Training Builder. It allows the user to view/delete/change initial values of existing variables, or create new variables.
Clicking '+' at the top right corner of the Edit Variables and Initial Values dialog will add a new variable. The user can click to change the name of the variable, select its type from the combo box, and set its initial value.
Inputs
Inputs are entities used as triggers for actions in the Training Builder diagram. For example if multiple nodes in the diagram use a Scene Node, it can be used as input and be connected to multiple blocks. Updating the input once will be reflected to all blocks using this input.
| Icons | Inputs Name |
| Sequence | |
| Scene State | |
| Scene Node (object) | |
| String | |
| Variable | |
| Action | |
| Boolean | |
| Hand |
Events
Events are triggered when something happens in the VR experience.
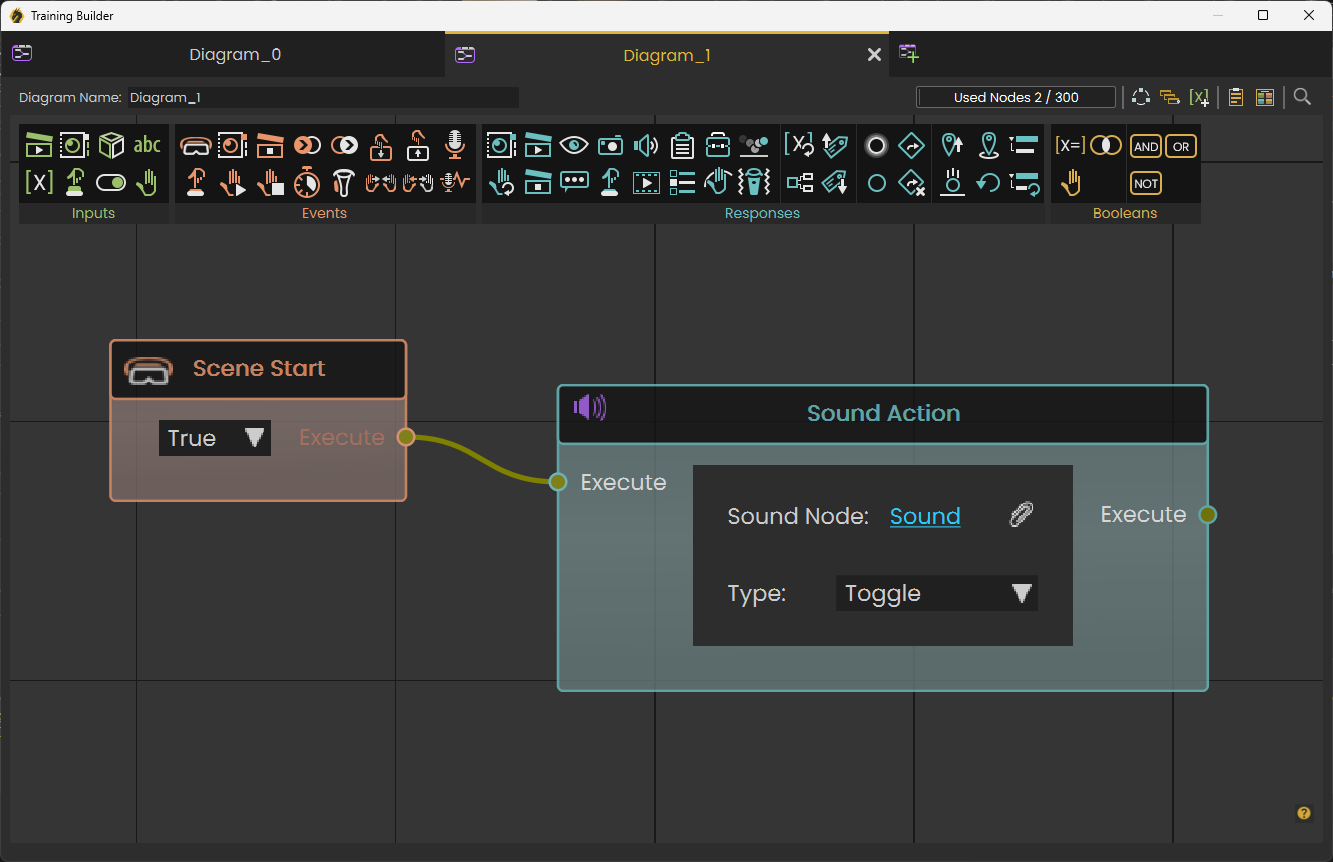
The following image shows how to use Scene Start Event, which takes place as soon as the VR experience starts, to play Sound Action Response.
| Icons | Events Name |
| Scene Start | |
| Scene State Applied | |
| Sequence Ended | |
| Node Entered Node | |
| Node Exited Node | |
| Hand Entered Node | |
| Hand Exited Node | |
| Voice Command Recognizer | |
| Node Triggered | |
| Node Grab Started | |
| Node Grab Ended | |
| Delay | |
| Grip Pressed | |
| Hand Entered Hand | |
| Hand Exited Hand | |
| Voice Command Test |
To learn more about Grip Press event check this tutorial.
Responses
Responses are defined reactions to events. To link a Response to an event simply the user needs to connect the Execute channel from Event to the execute channel of a Response. The user can connect the output Execute channel from a Response to input Execute channel of another response to guarantee order of execution and to link multiple responses to an Event.
In the diagram below shows responses to clicking on an object (Node Triggered)
1- Play a Sequence
2- Wait for 2 seconds
3- Hide an object from the scene
| Icons | Responses List |
| Apply Scene State | |
| Change Node Grabbable State | |
| Play Sequence | |
| Stop Sequence | |
|
Show/Hide |
|
|
Show Message Box |
|
| Teleport to Camera | |
| Change Node Action | |
| Sound Action | |
| Video Action | |
| Report user-defined measurement | |
| Active Quiz/Survey | |
| Change Equipment State | |
| Change Grabbable Sequence | |
| Enable/Disable Physics | |
| Vibrate Controller | |
| Advanced Change Variable Value | |
| Branch (Checks value if true follows one path if false follows the other) | |
| Get Attribute Value | |
| Set Attribute Value | |
| Glow Object | |
| Un-glow Object | |
| Point To Object | |
| Remove Point To Object | |
| Get Position | |
| Set Position | |
| Fall to Surface | |
| Reset Rotation | |
| Set Parent | |
|
Reset Parent |
Booleans
Booleans includes two groups States, and Operations.
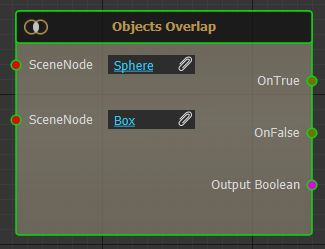
States are similar to events, and the current state can always be gotten from them. For example in the following image, Objects Overlap is shown, if the two objects Overlap you get OnTrue execution, as soon as they do not, you get OnFalse execution. The output Boolean value can be checked at any point to see if they are Overlapping on not. OnTrue or OnFlase are only fired when the state changes.
Opinations allow running Boolean operations on Boolean variables. Supported operations include And, Or and Not
| Icons | Booleans List |
|
|
Compare Variable Value |
| Objects Overlap | |
| Object is Grabbed | |
| And Operation | |
| Or Operation | |
| Not Operation |
Templates
Training Builder works great for describing multiple step training scenarios. But what if the same behavior is repeated for a class of objects. For example if the user ends grabbing any of the tools in the training, the response should be for it to fall to the ground, this is when templates are used.
To Create a Template diagram in Training Builder click Create Template button at the top right side of the Training Builder.
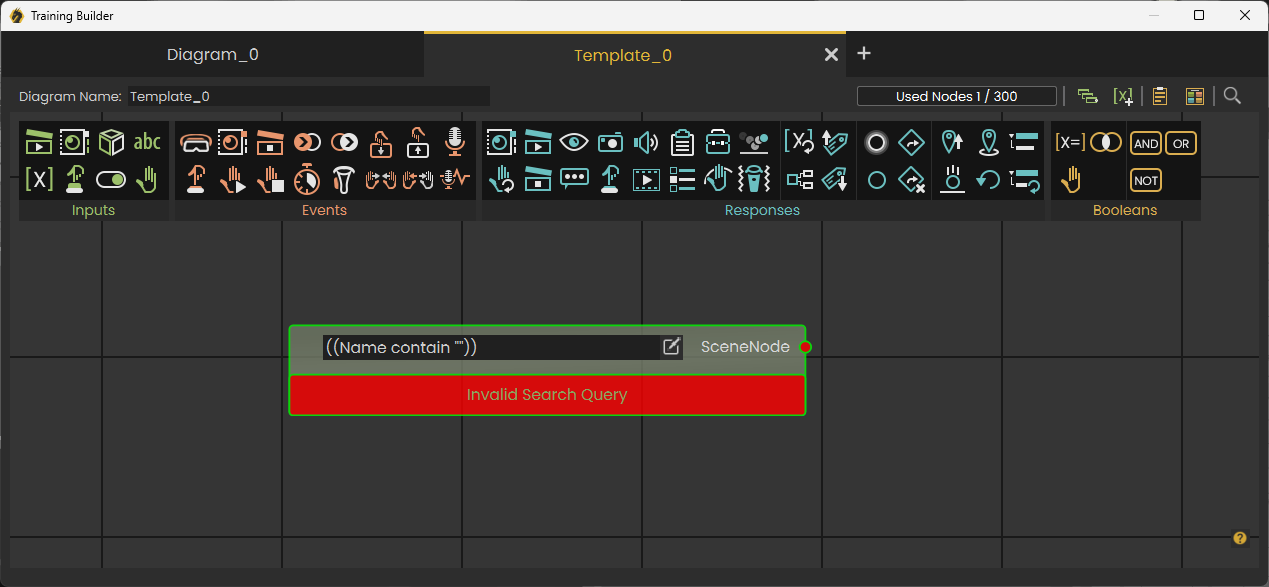
After clicking Create Template , a new Template diagram is added. A template diagrams is different from regular Training Builder diagram in its orange background marks, and in Template Scene Node block added in it. This block can not be deleted.
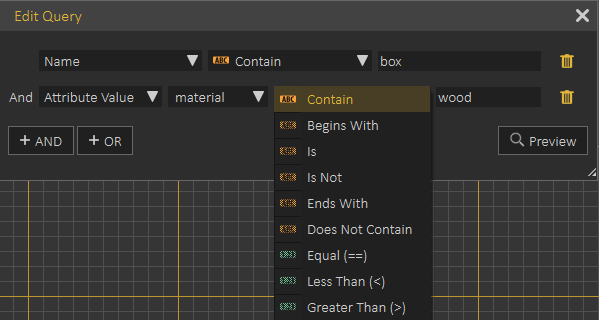
Template Scene Node block selects a group of Nodes based on query that can include one or more rows connected with And or Or, as shown in the following image.
Logic connected to Templet Scene Node block will be applied to each Node that satisfies the selection query, for example in the previous image, each object having "box" in its name, and having "wood" in the value of its material attribute will be selected.
The following tutorial shows the power of Template Diagrams in the training builder
Advanced Features
Copy part of a diagram
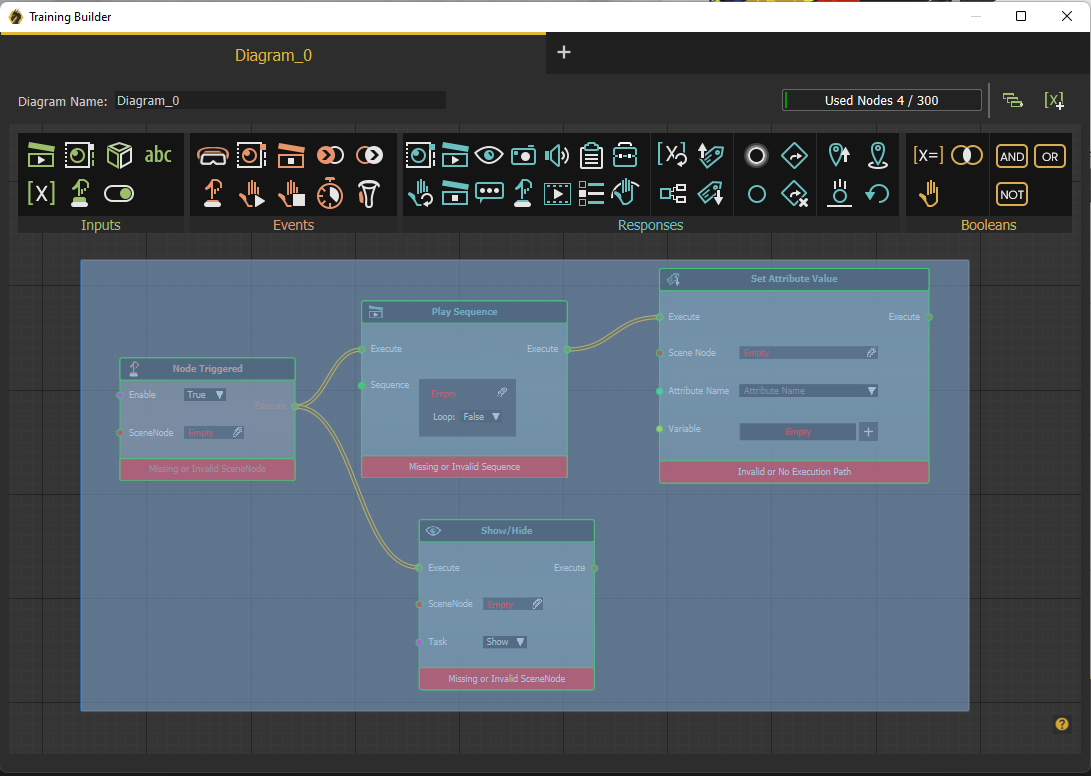
To repeat same logic for more than one object (in case templates did not do the job), part of the diagram can be copied. This is done by using the Left Mouse button to highlight the part of the diagram to copy, while the section is highlighted click CTRL + C to copy it, then CTRL + V to Paste. After that the Scene Node Object needs to be changed, and any block that needs update.
Drag/Drop of the scene
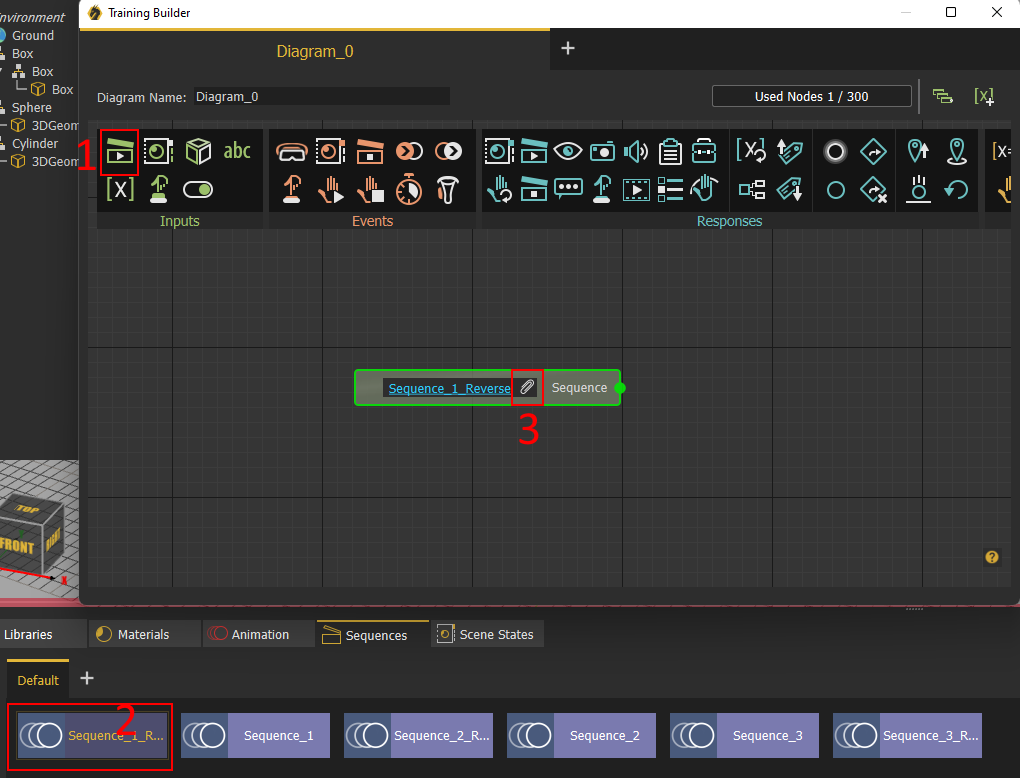
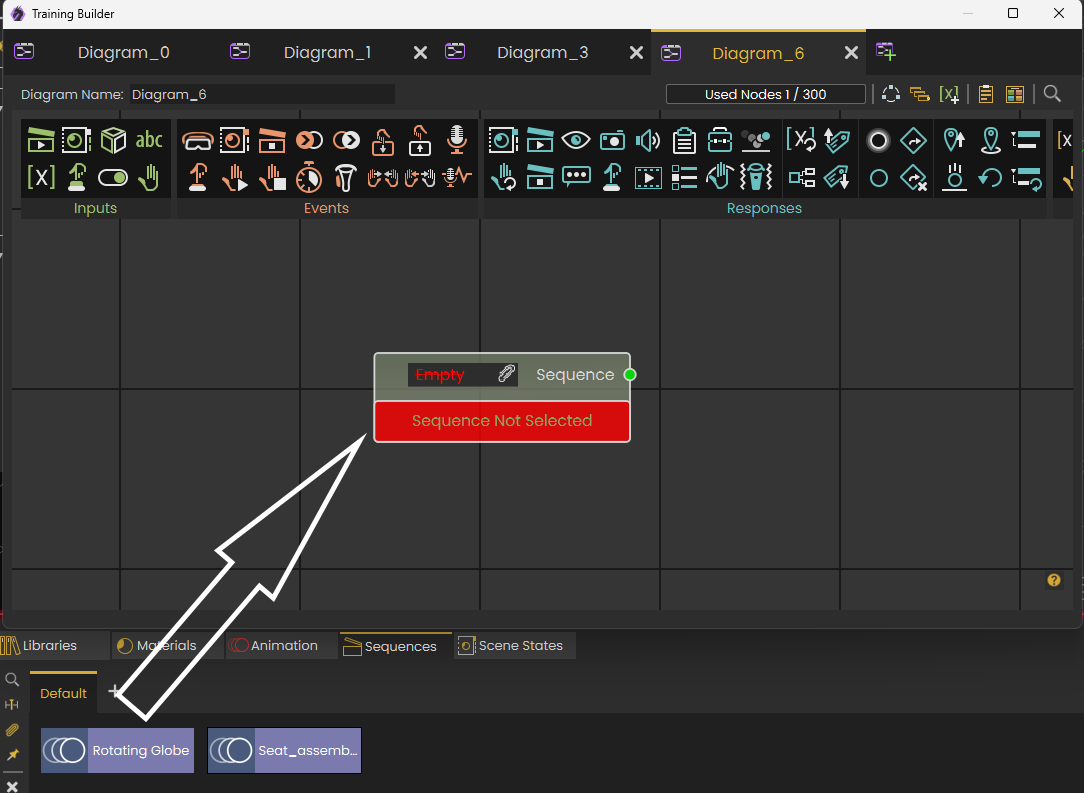
To add inputs like a Scene State or a Sequence, the following process is used
1- Click on Sequence from the toolbar
2- From Sequence Library select the desired Sequence
3- Click attach Sequence
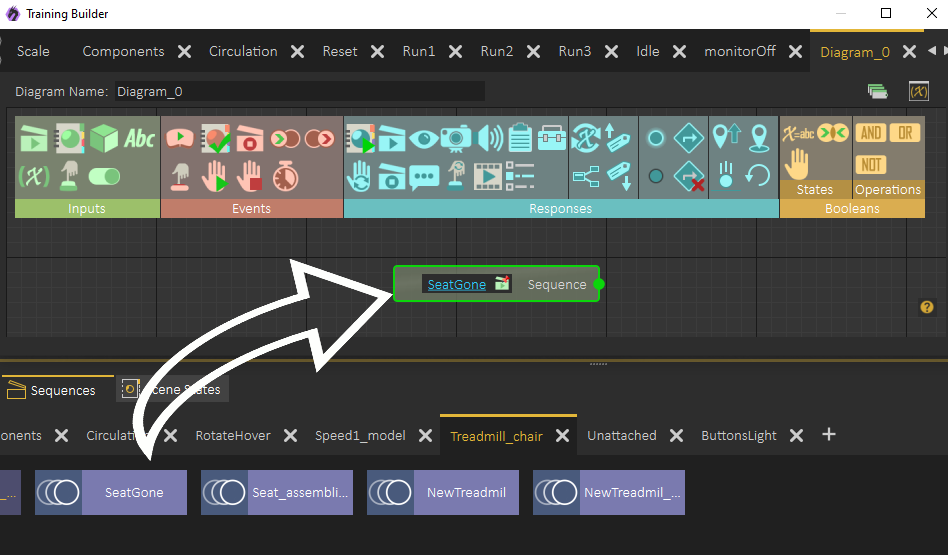
As shown in the following image
If you know the Sequence or the Scene State you can directly drag it from the Library and drop it on the Training Builder
Right Mouse
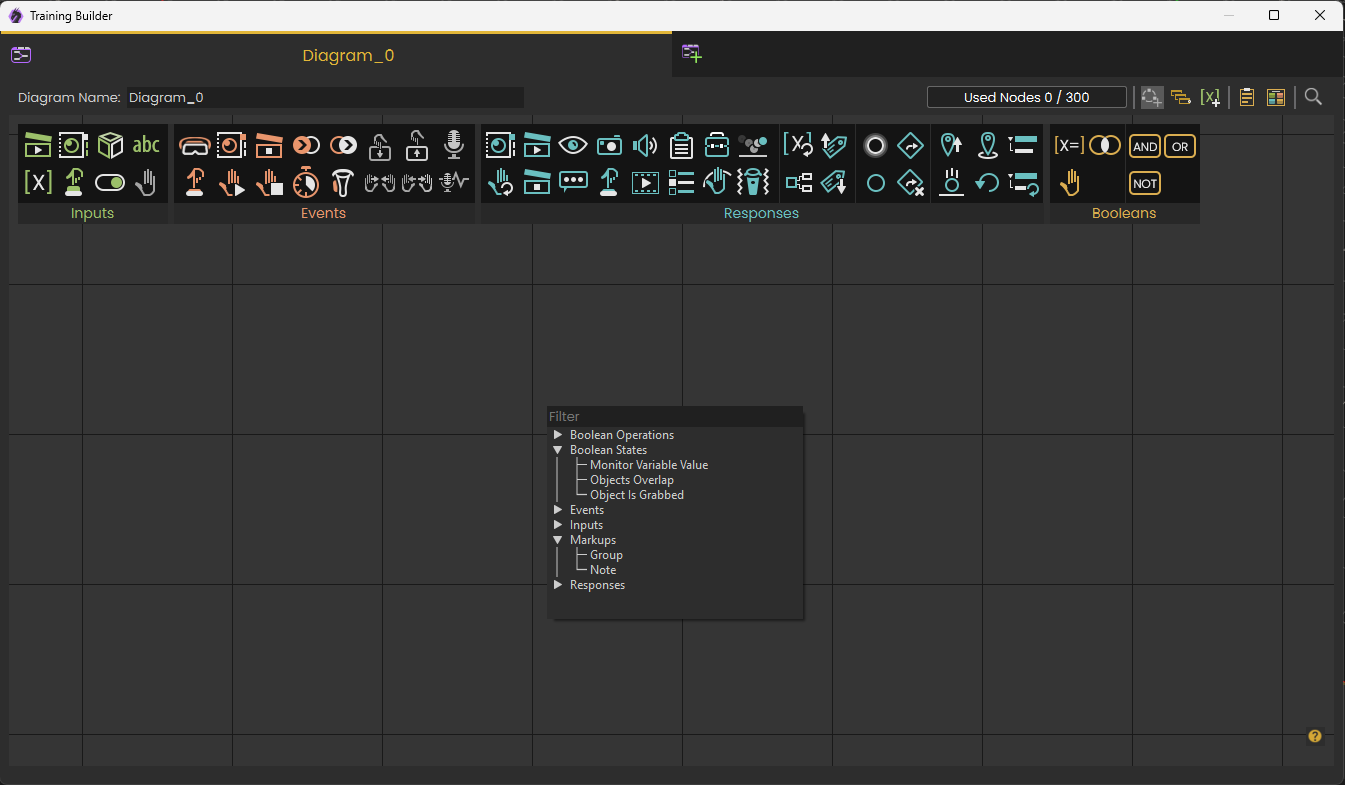
Clicking Right click in the training builder shows all toolbar elements, organized, so you can add any block without moving the mouse to the tool bar.
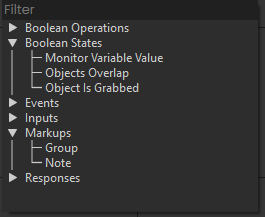
You can also click few characters in the filter to find an element quickly, as shown in the following image.
Attributes
Attributes can be used with Training Builder in many ways:
- They can be used for creating Template diagrams
- They can be checked to determine behavior
- They can be used as local variables saved on each object.
It is a good idea to be familiar with attributes to create advanced VR experiences. To learn more about attributes check the following tutorial
Tools to organize Training Builder experience
Dynamic Training Builder
The Dynamic Training Builder is available in SimLab VR Studio Pro. You can learn more about Dynamic Training Builder in this document.











No Comments