
Animation Timeline
SimLab Studio is able to Import Rigid and flexible (Joints-based rigged) bodies animations as well as create animation for objects in the animation timeline through several tools.
To access the Animation timeline, open the Animation Tab in the library panel at the bottom of SimLab Studio.
Animation Timeline User Interface

1. Animation Keyframes Creation tools
|
|
Auto Key | When toggled, any change in transformation for objects is recorded as a keyframe automatically when the current key frame is other than 0. |
 |
Capture object keyframe | Captures a keyframe with the selected object's transformation at its current state. |
 |
Capture camera keyframe | Captures a keyframe for the active camera's transformation and view. |
 |
Show Object | Toggles on the visibility of the selected object during animation. |
 |
Hide Object | Toggles off the visibility of the selected object during animation. |
 |
Director Record | Captures the camera's live movement in the scene as a sequence of keyframes along the animation range. |

2. Keyframes Management tools
 |
Go to previous keyframe | Moves the current time slider to the previous keyframe. |
 |
Go to next keyframe | Moves the current time slider to the next keyframe. |
 |
Select all keyframes | Selects all keyframes and generated animations in the timeline. |
 |
Group keyframes | Group selected keyframes into a single group element. |
 |
Break Group | Breaks a group into keyframes. |
 |
Move keyframe | Moves the selected keyframes to a specific frame. |
 |
Copy keyframe | Copies and moves the selected keyframe to a specific frame. |
 |
Delete selected keyframe | Deletes the selected keyframes from the timeline. |
 |
Delete all | Deletes all keyframes from the timeline. |
3. Animation Sequences tools
 |
Create Animation Sequence | Converts the selected keyframes in the timeline to an Animation Sequence. |
 |
Show Animation Sequences list | Displays a list of all Animation Sequences where you can edit, modify their group or delete them. |
4. Generate Animation tools
 |
Round Table | Creates an animation where an Object revolves up to 360 degrees around its center. |
 |
Follow Path | Animates an object along a path. |
 |
Wheel Animation | Creates a wheel animation of an object around a center point while determining the number of revolutions. |
 |
Round Table | Creates an animation where a camera revolves up to 360 degrees around its center point of view. |
 |
Helical | Creates an animation where a camera revolves up to 360 degrees around its center point of view while descending downwards. |
5. Capture Video
 |
Render View in VR | Renders an animated camera as a sequence of images using the SimLab VR Viewer. |
 |
Open Movie Maker | Opens the Movie Maker, where you can compile a sequences of images into a single video file. |
 |
Go to first frame | Moves the current time slider to the first frame in the animation range. |
 |
Backward Play | Plays the animation in the timeline in reverse. |
 |
Play | Plays the animation in the timeline. |
 |
Go to last frame | Moves the current time slider to the last frame in the animation range. |
 |
Scale timeline | Scales up and translates all the keyframes in the timeline. |
 |
Start of Animation Range | Sets the start of the animation range by being dragged to a specific frame or by double clicking and entering the value numerically. |
 |
Current Time Slider | Sets the current time in the animation timeline by being dragged to a specific frame or by double clicking and entering the value numerically. |
 |
End of Animation Range | Sets the end of the animation range by being dragged to a specific frame or by double clicking and entering the value numerically. |
Animation Creation
To create Animation in SimLab Composer/Studio there are two methods that can be followed depending on the type of animation you want to create, you can either manually create the animation by transforming objects and capturing keyframes, or you can use object and camera tools to generate procedural animation such as wheel and path animation.
Watch these tutorials to learn more about animation in SimLab Composer/Studio
1. Animation Through Capturing Keyframes
If the auto key button is toggled, all you need to do to animate an object is to move the current time indicator/slider to a frame other than 0, then move, rotate or scale the object (change its transformation) and 2 key frames will be created, a key frame at frame 0 to store its initial transformation, and the second key at the current time to store the new transformation.
When playing the animation, an interpolation between the 2 keyframes will be automatically created and the object will transform from its initial state to the new state.
 In this example, the car object was selected, and the current time slider was moved to frame 30, then the car was moved 2 meters, so 2 keyframes were created at frame 0 and frame 30 to denote the animation of the car
In addition to the standard transformation animation, there are other attributes or elements you can animate, each with a different keyframe type representing it in the timeline.
 |
Transformation Keyframe | Created when an object has a change of transformation (rotation, location, scale) along the timeline. |
 |
Visibility Keyframe | Created when an object has a change of visibility along the timeline using the "show and hide object in animation" buttons |
 |
Light Keyframe | Created when a light has one or more attributes (color, power, cone angle, etc) changes along the timeline. |
 |
Material Keyframe | Created when a material attribute (texture, color, reflection, etc) changes along the timeline. |
 |
Camera Keyframe | Created when a camera has a change of transformation (position, target) along the timeline, either through capturing or using the director record tool. |
2. Automatic Camera and Object Animation
SimLab Composer/Studio have several tools that enable you to automatically create a procedural animation for an object or a camera without manually adjusting the time slider and changing the objects transformation.
These tools can be accessed from the Object Animation and the Camera Animations menus at the top of the timeline panel.

When an object or a camera is selected and one of those tools is clicked, a dialog will appear to set the parameters for the automatic animation that is to be generated.
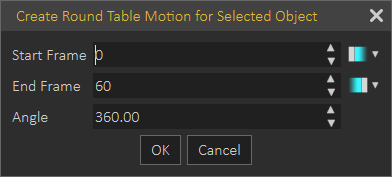
This is an example of an animation dialog that appears when the user selects the round table animation. In this dialogue, the user has to specify the start frame and the end frame, as well as the angle of rotation for the object or the camera.

The Round table animation will be represented as a single block instead of multiple keyframes, since it cannot be modified manually but rather through its attributes that appear in the panel to the right.
Keyframes Interpolation (Ease in and Ease out)
Animations in SimLab Composer/Studio have a linear interpolation by default, which means that objects or attributes are animated at a constant speed throughout the animation range, however, there is a way to change the interpolation of animation by setting the keyframes interpolation to to an ease in or ease out interpolation.
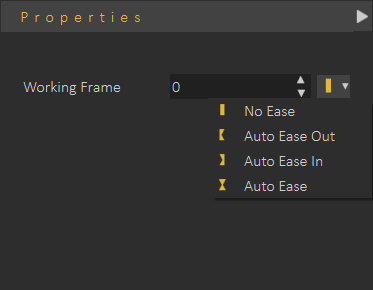
To change a keyframe interpolation, Select the key frame, and from the Properties panel to the right, open the interpolation drop down menu and select ease in, ease out, or auto ease.

To change the interpolation for an object or a camera's automatic animation, Select animation block, and from the Properties panel to the right, open the interpolation drop down menu for the start frame and select ease in, ease out, or auto ease, and the menu for the end frame to change the interpolation at the end of the animation
When choosing the Ease out interpolation, which should be applied at a frame at the beginning of the animation, the speed of the animation starts at 0 and then accelerates gradually to get to a constant speed.
With the Ease in interpolation, which should be applied to frame at the end of an animation, the speed decelerates towards 0 instead of abruptly changing to 0.
The Auto Ease interpolation combines both the Ease in and Ease out and is usually used for keyframes in the middle of an animation where the speed goes down as the current time slider approaches that keyframe, and it picks up again as it leaves it.

Notice the constant speed in the default linear interpolation (top) and the acceleration in the Ease out interpolation (bottom).
Utilizing Animation in VR
To utilize imported or created animation in VR you need to first store it as a component named "Animation Sequence", and then you can either attach it to a Play Sequence Response in the Training Builder, or use it as a Grabbable Sequence.
Animation Sequence Creation
To create an Animation Sequences you need to select all the animation keyframes regardless of their type for all the objects you want to include in the animation sequences, then click on the "Create Animation Sequence" button in the animation panel.

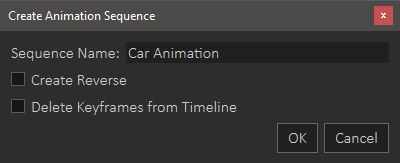
In the creation Dialog, type a name for the Sequence. and choose whether you want to create a reversed version of the animation, and whether you want to delete the animation from the timeline or not.
Created Animation Sequences can be found in the Sequences tab next to the Animation tab in the bottom panel in SimLab Composer.
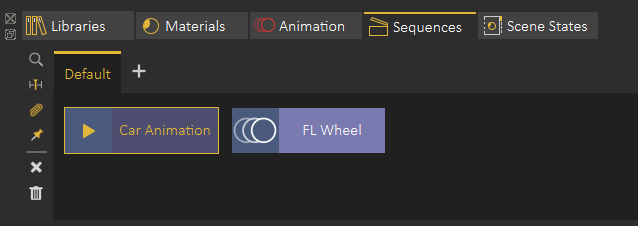
from the Sequences tab you can:
- Preview Animation Sequences.
- Attach Animation Sequences to responses in the Training Builder.
- Find the objects that are affected by the animation sequence.
- Send Animation Sequences to the timeline.
- Attach Sequence to object (in case if importing a flexible body animation and you want to attach it to a joints-rigged object).
- Make flex object stationary (in case of having a walk cycle for example, and you need to keep the walking animation but dispose of the object's translation).
Attaching Animation Sequence to Responses
In the Training Builder, create a Play Sequence Response, then select the Animation Sequence from the Sequences tab and then click the attach button on the Play Sequence Response.
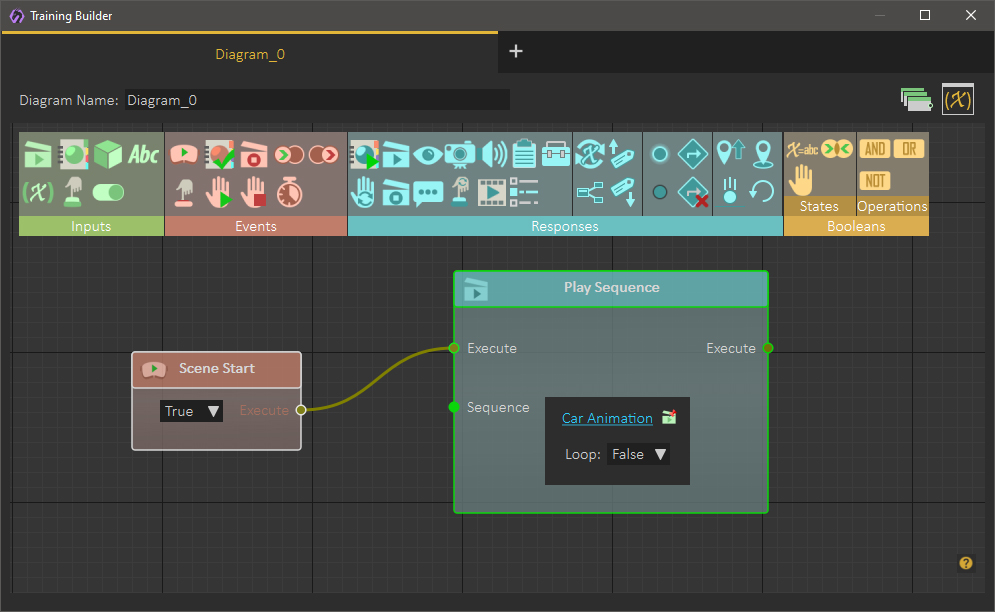
The Animation in VR will play once the Event attach to the response occurs.
Grabbable Sequences
Grabbable Sequences are a type of objects grabbing that constricts the movement of the grabbable object through an Animation Sequence.
A practical example would be to create a Lever's animation of it going up and down, then set it as a Grabbable Sequences where the user can grab the Lever arm but can only move it up and down in accordance with its created animation, unlike regular grabbing where the user can move and rotate the object in any direction.
To create a Grabbable Sequence from an animation Sequence follow these steps:
- From the interactions menu select "Make Grabbable Sequence".
- Select the 3D object that you need to make grabbable and click the check mark.
- Select the Animation Sequence you want to attach to the object and click the check mark again.
- Specify the grabbing visual helper's size then click the check mark again to finish the process.
No Comments