
Demonstrating the VR Experiences
SimLab VR Viewer is a versatile software that operates seamlessly across multiple platforms, including PC, VR headsets connected to PCs, and standalone VR devices, as well as mobile devices. It also enables users to join the same VR session from different devices through SimLab VR Collaboration, fostering a collaborative and interactive experience.
Depending on your client's interests and needs, you may need to run the VR Experience on a specific platform or elaborate on the diverse capabilities across various platforms, highlighting the flexibility and accessibility that SimLab VR Viewer offers.
Desktop Mode
SimLab VR Viewer is designed to run smoothly on both PC and Mac, ensuring broad accessibility and flexibility for various users. This cross-platform compatibility guarantees that your clients can fully experience the immersive VR content, regardless of their operating system.
In the previous sections, we provided comprehensive instructions on how to access the VR Experiences, utilizing Desktop mode for these instructions, simply select the VR Experience and from the panel to the right, click on Desktop.
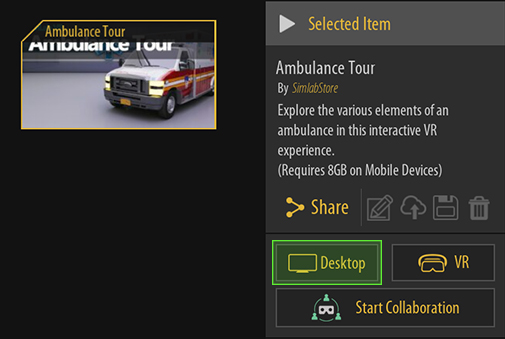
This approach ensures that you can easily navigate and demonstrate the VR Experiences to your clients. The process is intuitive and user-friendly, allowing you to focus on delivering a captivating presentation rather than worrying about technical difficulties. By following these guidelines, you can confidently showcase the full range of features and interactive elements that SimLab VR Viewer offers, whether you are operating on a PC or a Mac.
PC-VR mode
PC-VR mode allows you to run the VR experience on a VR headset connected to a PC through the SimLab VR Viewer software that is installed on the computer. This mode provides a fully immersive experience and achieves the highest quality of VR viewing possible. The quality and performance in PC-VR mode rely heavily on the specifications and capabilities of the connected computer rather than the VR headset itself. This means that with a powerful PC, you can enjoy enhanced graphics, smoother performance, and a more detailed and realistic VR environment, offering your clients an unparalleled virtual reality experience.
The supported VR devices when running this mode are: HTC Vive, HTC Pro, Oculus Quest 2, Oculus Quest 3, Oculus Quest 3S, Oculus Quest Pro, Oculus Rift, Oculus Rift S, and All Windows Mixed Reality devices.
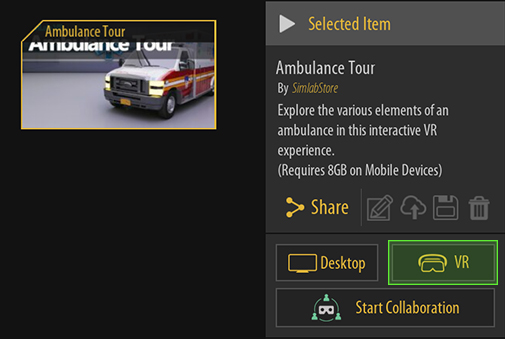
To run the VR Experience in PC-VR mode simply select the VR Experience and from the panel to the right, select VR.
Standalone VR Devices
SimLab VR Viewer is also compatible with standalone VR devices, offering an alternative solution that eliminates the need for a computer during presentations. This flexibility not only streamlines the setup process but also enhances mobility, allowing you to run the VR Experience in various environments without being tethered to a computer. With standalone VR devices, you can effortlessly transport and showcase immersive VR content to clients, ensuring a seamless and engaging presentation experience.
The supported standalone devices are: Pico Neo 3, Pico Neo 3 pro/ Pro eye, Pico 4, Pico 4 Ultra, HTC Vive XR Elite, HTC Vive Focua Vision, HTC Vive Focus 3, Oculus Quest 2, Oculus Quest 3, Oculus Quest 3S and Oculus Quest Pro.
To run VR Experiences on standalone devices, you need to first install SimLab VR Viewer on the devices, following this, we will delve into the specifics of installing SimLab VR Viewer on various standalone devices, providing detailed instructions tailored to each type of device.
Installing and using VR Viewer on Oculus Quest
To install SimLab VR Viewer on an Oculus device Click here to go to Meta store and sign in to your Meta account, then click "Get".
Once you have added VR Viewer to your Meta account, you will find the application on your Quest device and can install it and run it.
In SimLab VR Viewer, Sign in using the username and password SimLab Soft has provided you with or you can pair the device with the desktop version of SimLab VR Viewer. (Click here to learn more about pairing).
From this point on, the process is similar to desktop mode where you go to the "Obtained Models" tab and then select the catalog to view its contents, and then selecting the desired VR Experience and pressing the VR Button.
Hand Tracking on Oculus Quest
If you are planning on using the controllers with Oculus Quest in standalone mode, the controls are identical to the PC-Mode controls we mentioned earlier, and to learn more about the controls, Run the 1st VR Tutorial Experience that you can find in the "SimLab Models" Tab.
If you want to utilize hand gestures then place the controllers somewhere to keep them stationary and position your hands within the Oculus Quest's field of vision and it will automatically switch to hand tracking and enable hand gestures, alternatively you can double tap the controllers to each other to switch to the hand tracking mode.
you can watch the following Video to learn more about utilizing hand tracking within a VR Experience.
Casting Oculus Quest on a Screen
When using a standalone device, its a good practice to cast it on a bigger screen so that users other than the one wearing the VR headsets are able to see the VR Experience.
-
Ensure Network Connectivity:
- Make sure both your Oculus Quest and computer are connected to the same network.
-
On the Oculus Quest:
- Open the "Home" menu.
- Select the "Camera" option.
- Choose "Cast".
- Select "Computer" as the casting destination.
- Click "Next".
-
On the Computer:
- Open a web browser and navigate to Oculus.com/casting.
- Log in with your Meta account.
-
Begin Casting:
- Once logged in, the casting from the Oculus Quest to the computer will begin automatically.
Click here to learn more about casting.
Installing and using VR Viewer on Pico
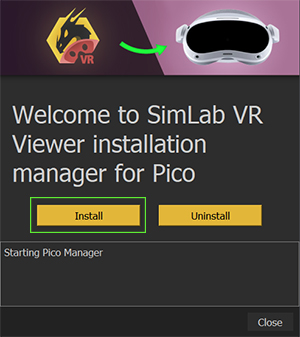
To Install SimLab VR Viewer on Pico 3 and 4, Click here and click on "Get" then select your operating system to download the SimLab Pico Manager.

Once the download is complete, install SimLab Pico Manager and run it. Ensure that your Pico device is connected to your computer via a USB port, then click "Install" from the Manager.
Upon successfully installing VR Viewer on your Pico device, run it, and similar to the previously mentioned platforms, sign in with the username or password SimLab soft has provided you with, and then go to the "Obtained Models" tab, and select the available catalog, then the VR Experience you want to run and press the button named "VR".
Casting Pico on a screen
When using a Pico, it is advisable to cast it on a big screen so that other users are able to see the VR Experience. to cast Pico on a web browser, insure that both devices are on the same network and go to the home menu and from the menu bar click on the Screen Casting icon, from the next menu that appears select cast to browser, another window will appear with a URL, take the URL and open it on your web browser to start casting.
Click here to learn more about Pico casting options.
No Comments