Responses
- AI Agent
- Data Types \ Number \ Operations
- Data Types \ Number \ Variable
- Data Types \ Number \ Compare
- Data Types \ Number \ Conversion
- User \ Controller
- User \ Transform
- User \ Gadget
- User \ Attributes \ String
- User \ Point To Object
- User Name & ID
- Execution \ Branch
- Execution
- Media
- SceneNode \ Nodes Management
- SceneNode \ Transform \ Location
- External Connection \ WebSocket
- External Connection \ Cloud
- Scene
- Media \ Variable Writer \
AI Agent
 AI Agent Start Listen

The AI Agent Start Listen node is used to make the AI start listening to the user. When activated, this node enables the AI to process and listen to spoken input from the user, allowing for interactive conversations and commands within the VR environment.
Example

In this example, an AI Doctor is set up in the AI Agents window. This window can be accessed by clicking the Interaction icon in the viewport menu, then select the AI Agents, and then add the AI name with the desired instructions in the Instructions field. A variable is created to store the AI's responses.

The AI Agent Start Listen node is used to make the AI Agent named Doctor start listening to the user when the object named "Start" is triggered. This setup enables the AI to process and listen to user input as soon as the trigger event is activated.
 AI Agent Stop Listen

The AI Agent Stop Listen node is used to make the AI stop listening to the user. When activated, this node halts the AI’s ability to process further user input, allowing the AI to respond based on the information gathered up to that point.
Example
In this example, an AI Doctor is set up in AI Agents window. This window can be accessed by clicking the Interaction icon in the viewport menu, then select the AI Agents, and then add the AI name with the desired instructions in the Instructions field. A variable is created to store the AI's responses.

The AI Agent Stop Listen node is used to stop the AI Agent from listening to the user when the "Stop" trigger event occurs. This allows the AI agent named Doctor to respond based on the input received before listening was stopped.
 Has Valid AI Key

The Has Valid AI Key node checks whether a valid AI key is available for AI-related features in Sim Lab Composer. This node ensures that AI functionalities can operate properly by verifying the presence of an active and valid AI key.
Example

In this example, the Has Valid AI Key node is used at the start of the scene to check if the user has an activated AI key. The node is connected to a Branch node, where the False output (indicating no valid AI key) triggers a message in front of the user, informing them that the AI key must be activated.
 Set AI Key

The Set AI Key node allows you to assign an AI API key to a VR experience directly from the Training Builder. This lets the experience use AI features without requiring the user to manually activate an API key in the viewer. You can select the provider (OpenAI, Gemini, or OpenRouter) and embed the corresponding API key into the experience.
Example
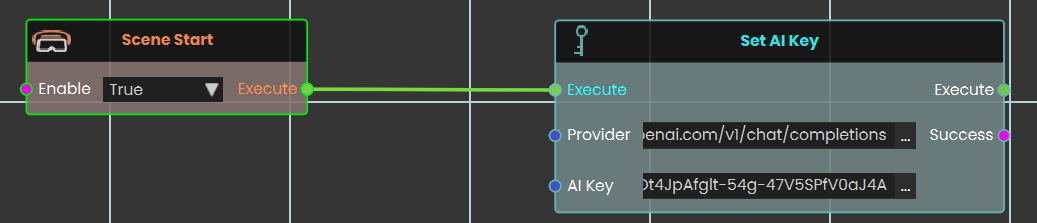
In this example, the Set AI Key node is connected to a Scene Start event to initialize the AI provider as soon as the experience begins. After adding the node and selecting the provider, the API key is pasted into the node’s field. The key is then activated when the scene starts, allowing the AI agent to respond without the user needing their own key. If the embedded key is not active or reaches its usage limit, the experience automatically switches to the user’s API key in the viewer if one is available.
Check this tutorial for more about this node.
 Set AI Agent Model

The Set AI Agent Model node is used to assign a specific AI provider and model to an AI agent in your VR experience. This ensures the AI agent will operate using the selected provider and model for any interactions that occur in the scene. You can choose the AI agent you have created, specify the provider (OpenAI, Gemini, or OpenRouter), and define the model name.
Example
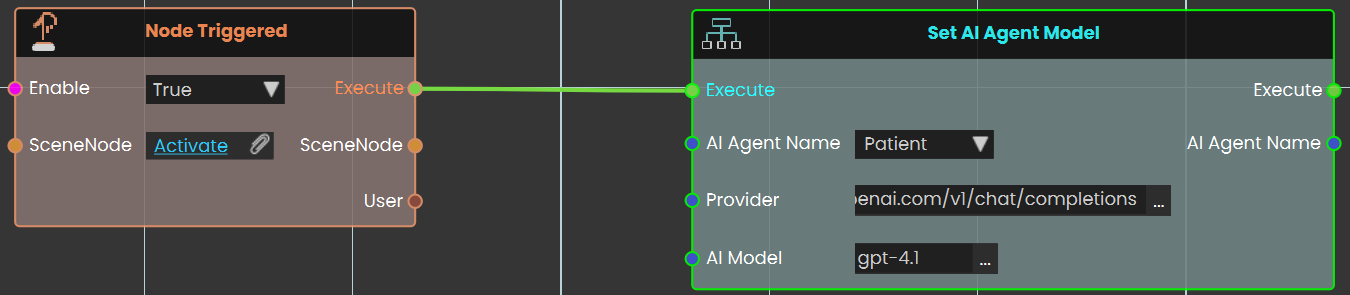
In this example, the Set AI Agent Model node is triggered by pressing a button in the VR scene. When the button is clicked, the node assigns the “Patient” AI agent to the OpenAI provider and sets the model to GPT‑4. This setup allows the AI agent to function with the defined provider and model as soon as the event is triggered.
Check this tutorial for more about this node.
Using AI Providers and API Keys in SimLab Composer
SimLab Composer now supports OpenAI, Google Gemini, and OpenRouter for integrating AI into your VR experiences. With the new Set AI Key and Set AI Agent Model nodes, you can connect your experience to these providers .
Providers and Models:
1️⃣ OpenAI
-
Provider URL:
https://api.openai.com/v1/chat/completions -
Models:
-
gpt‑4.1
-
gpt‑4
-
gpt‑3.5‑turbo
-
2️⃣ Google Gemini (OpenAI‑compatible endpoint)
-
Provider URL:
https://generativelanguage.googleapis.com/v1beta/openai/chat/completions -
Models:
-
gemini‑2.0‑flash
-
3️⃣ OpenRouter
-
Provider URL:
https://openrouter.ai/api/v1/chat/completions -
Models:
-
openrouter/cypher‑alpha:free
-
nvidia/llama‑3.3‑nemotron‑super‑49b‑v1:free
-
OpenAI keys work with Chat, Text‑to‑Speech, and Speech‑to‑Text.
-
Gemini and OpenRouter keys work with Text only.
-
-
Data Types \ Number \ Operations
 Add
Add

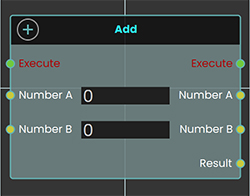
The Add response enables user to add two values by either typing in a numerical value in Number A and Number B field or by attaching a value or a variable node to those ports, then once the response is executed the resulting value can be acquired through the Result port.
Example
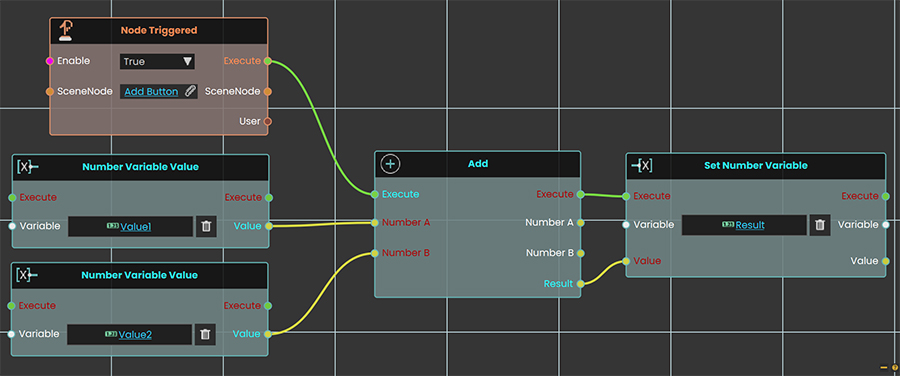
In this Example an Add Response is used to add the values of 5 to the value of Variable1 once the user triggers the object named Activate, and the result of the addition is then written in a variable named Result, which can then be connected to a variable writer to be displayed during the VR Experience.
 Subtract
The Subtract response enables user to subtract a value from another by either typing in a numerical value in Number A and Number B field or by attaching a value or a variable node to those ports, then once the response is executed the resulting value can be acquired through the Result port.
Example
In this Example a Subtract Response is used to subtract the value of Variable1 from the value of the variable named Variable2, once the user triggers the object named Activate, and the result of the subtraction is then written in a variable named Result, which can then be connected to a variable writer to be displayed during the VR Experience.
 Multiply
The Multiply response enables user to multiply two values by either typing in a numerical value in Number A and Number B field or by attaching a value or a variable node to those ports, then once the response is executed the resulting value can be acquired through the Result port.
Example
In this Example a Subtract Response is used to subtract the value of Variable1 from the value of the Variable2, then a Multiply Response is used to multiply the subtraction result by 3 once the user triggers the object named Activate, and the result of the multiplication is then written in a variable named Result, which can then be connected to a variable writer to be displayed during the VR Experience.
 Divide
The Divide response enables user to divide a value by another value, by either typing in a numerical value in Number A and Number B field or by attaching a value or a variable node to those ports, then once the response is executed the resulting value can be acquired through the Result port.
Example
In this Example a Divide Response is used to divide the number 25 by the value of the variable named "Variable1" and the result of the division is then written in a variable named Result, which can then be connected to a variable writer to be displayed during the VR Experience.
 Ceiling
The Ceiling response enables the user to round up a value by either typing in a numerical value in the Number A field or by attaching a value or a variable node to that port. Then once the response is executed, the smallest integral value greater than or equal to the input value can be acquired through the Result port.
Example
In this example, a Ceiling Response is used to round up the value of Variable1 to the smallest integral value greater than or equal to it once the user triggers the object named Activate. The result of the ceiling operation is then written in a variable named Result, which can then be connected to a variable writer to be displayed during the VR Experience.
 Floor
Floor
The Floor response enables the user to round down a value by either typing in a numerical value in the Number A field or by attaching a value or a variable node to that port. Then once the response is executed, the largest integral value less than or equal to the input value can be acquired through the Result port.
Example

In this example, a Floor Response is used to round down the value of Variable1 to the largest integral value less than or equal to it once the user triggers the object named Activate. The result of the floor operation is then written in a variable named Result, which can then be connected to a variable writer to be displayed during the VR Experience.
![]() ModuloModulo
ModuloModulo
The Modulo response enables the user to find the remainder of a division by either typing in numerical values in the Number A and Number B fields or by attaching values or variable nodes to those ports. Then once the response is executed, the modulus of the input value with respect to the divisor can be acquired through the Result port.
Example

In this example, a Modulo Response is used to calculate the remainder when the value of the variable named Variable1 is divided by the value of Variable2, once the user triggers the object named Activate. The result of the modulo operation is then written in a variable named Result, which can then be connected to a variable writer to be displayed during the VR Experience.
 Square Root
The Square Root response enables the user to calculate the square root of a value by either typing in a numerical value in the Number field or by attaching a value or a variable node to that port. Then once the response is executed, the square root of the input value can be acquired through the Result port.
Example

In this example, a Square Root response is used to calculate the square root of the value of Variable1 once the user triggers the object named Activate. The result of the square root operation is then written in a variable named Result, which can then be connected to a variable writer to be displayed during the VR Experience.
Data Types \ Number \ Variable
 Set
Set
Has two options:
-
By Value:
The Set number variable response enables user to set a value by either typing in a numerical value in the value field or by attaching a value or a variable node to that port. Then once the response is executed, the variable value can be acquired through the Value port.
Example

In this example, a Set number variable is used to assign the value of Variable1 once the user triggers the object named Activate, and the new value is then written in a variable named Result, which can then be connected to a variable writer to be displayed during the VR Experience.
-
By Expression
The Set number variable by expression response enables user to set a value by either typing in an expression in the expression field or by attaching a value or a variable node to that port. Then once the response is executed, the variable value can be acquired through the Value port.
Example
In this example, a Set Number Variable By Expression is used to set the result of the sum of Variable1 and Variable2 once the user triggers the object named Activate. The new value is then written in the Result variable, which can be connected to a variable writer to be displayed during the VR Experience.
![]() Increment Number Variable
Increment Number Variable
The Increment Number Variable response enables the user to increase a variable's value by 1 each time the event connected to it is triggered. Once the response is executed, the updated value can be acquired through the Value port.
Example
In this example, a Increment Number Variable response is used to increase the value of Variable1 by 1 once the user triggers the object named Activate. The result of the decrease number variable operation is then written in a variable named Result, which can then be connected to a variable writer to be displayed during the VR Experience.
 Decrement Number Variable
The Decrement Number Variable response enables the user to decrease a variable's value by 1 each time the event connected to it is triggered. Once the response is executed, the updated value can be acquired through the Value port.
Example
In this example, a Decrement Number Variable response is used to decrease the value of Variable1 by 1 once the user triggers the object named Activate. The result of the decrease number variable operation is then written in a variable named Result, which can then be connected to a variable writer to be displayed during the VR Experience.
![]() Number Variable Value
Number Variable Value
The Number Variable Value response enables the user to get a variable's value each time the event connected to it is triggered. Once the response is executed, the updated value can be acquired through the Value port.
Example
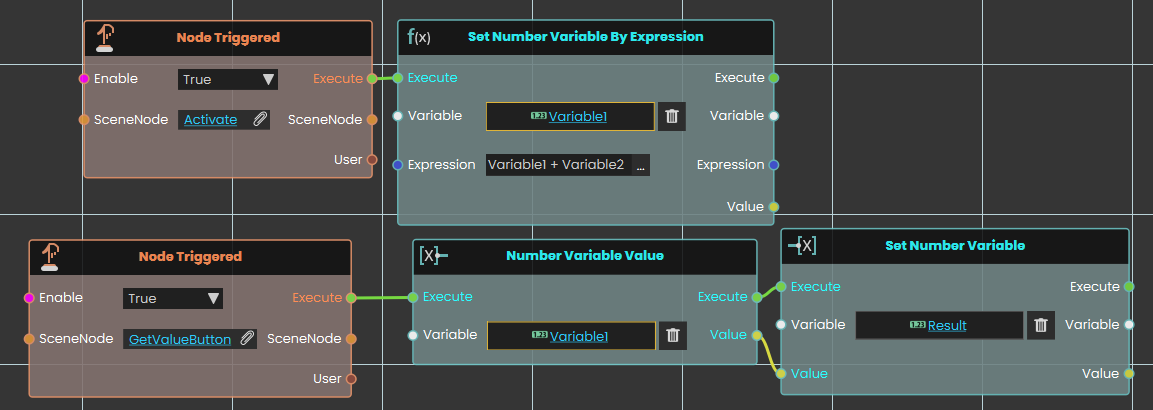
In this example, a Number Variable Value response is used to get the new value for Variable1 after it was changed by Set Number Variable By Expression once the user triggers the object named GetValueButton. The value of the number variable is then written in a variable named Result, which can then be connected to a variable writer to be displayed during the VR Experience.
Data Types \ Number \ Compare
 Equal (Number)
The Equal (Number) response enables the user to compare two values by either typing in a numerical value in the Number A and Number B fields or by attaching a value or a variable node to those ports. Then once the response is executed, the result of the comparison can be acquired through the Result port.
Example

In this example, an Equal Response response is used to compare the value of Variable1 with the value of Variable2 once the user triggers the object named Activate. The result of the comparison can be acquired through the Result port. We have connected this Result port to the Branch node, and if the result of the branch is True, the TrueBox will show; if the result is False, the FalseBox will show.
 Greater
The Greater response enables the user to compare two values to determine if one is greater than the other by either typing in a numerical value in the Number A and Number B fields or by attaching a value or a variable node to those ports. Then once the response is executed, the result of the comparison can be acquired through the Result port.
Example
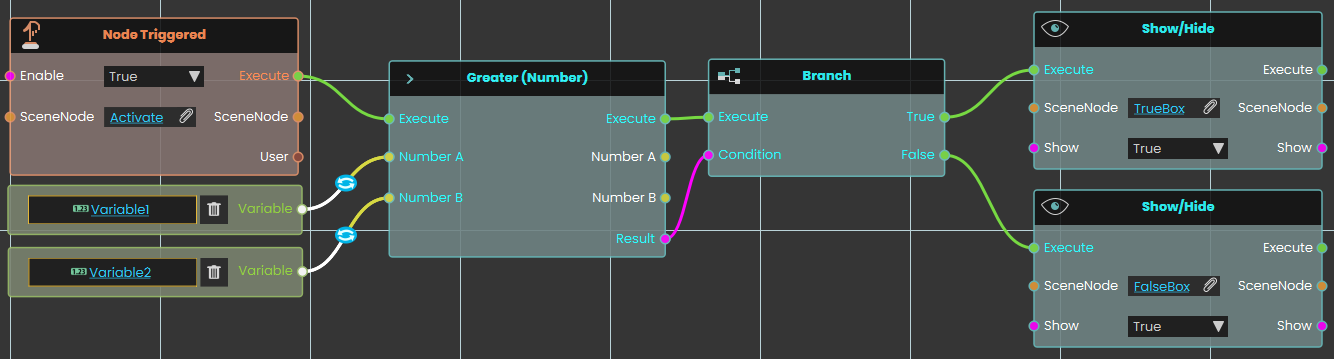
In this example, a Greater Response is used to compare the value of Variable1 with the value of Variable2 once the user triggers the object named Activate. The result of the comparison can be acquired through the Result port. We have connected this Result port to the Branch node, and if the result of the branch is True, the TrueBox will show; if the result is False, the FalseBox will show.
 Greater Or Equal
The Greater Or Equal response enables the user to compare two values to determine if one is greater than or equal to the other by either typing in a numerical value in the Number A and Number B fields or by attaching a value or a variable node to those ports. Then once the response is executed, the result of the comparison can be acquired through the Result port.
Example
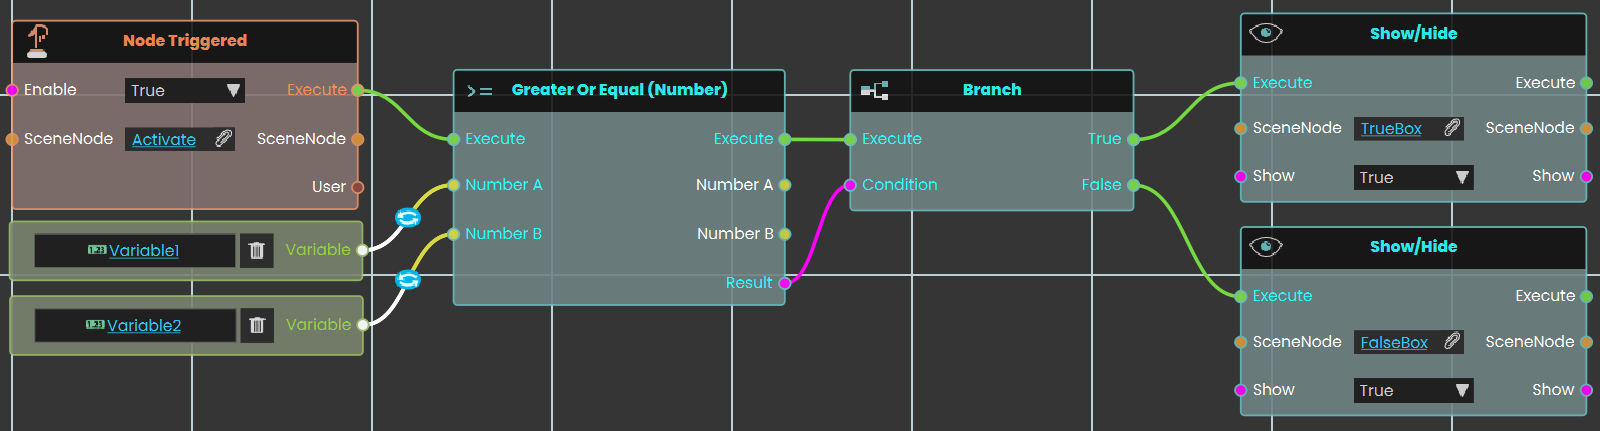
In this example, a Greater Or Equal Response is used to compare the value of Variable1 with the value of Variable2 once the user triggers the object named Activate. The result of the comparison can be acquired through the Result port. We have connected this Result port to the Branch node, and if the result of the branch is True, the TrueBox will show; if the result is False, the FalseBox will show.
 Less
Less
The Less response enables the user to compare two values to determine if one is less than the other by either typing in a numerical value in the Number A and Number B fields or by attaching a value or a variable node to those ports. Then once the response is executed, the result of the comparison can be acquired through the Result port.
Example
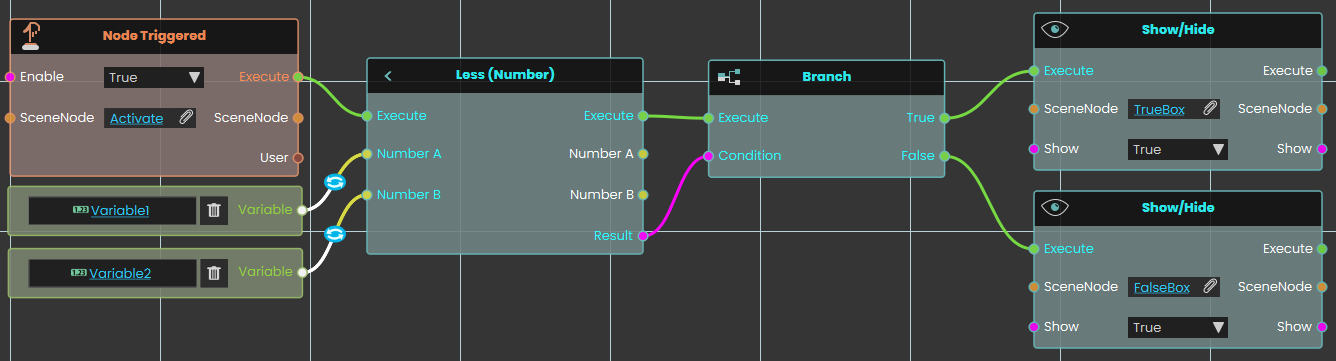
In this example, a Less is used to compare the value of Variable1 with the value of Variable2 once the user triggers the object named Activate. The result of the comparison can be acquired through the Result port. We have connected this Result port to the Branch node, and if the result of the branch is True, the TrueBox will show; if the result is False, the FalseBox will show.
 Less Or Equal
The Less Or Equal response enables the user to compare two values to determine if one is less than or equal to the other by either typing in a numerical value in the Number A and Number B fields or by attaching a value or a variable node to those ports. Then once the response is executed, the result of the comparison can be acquired through the Result port.
Example

In this example, a Less is used to compare the value of Variable1 with the value of Variable2 once the user triggers the object named Activate. The result of the comparison can be acquired through the Result port. We have connected this Result port to the Branch node, and if the result of the branch is True, the TrueBox will show; if the result is False, the FalseBox will show.
 Not Equal
The Not Equal response enables the user to compare two values to determine if they are different by either typing in a numerical value in the Number A and Number B fields or by attaching a value or a variable node to those ports. Then once the response is executed, the result of the comparison can be acquired through the Result port.
Example
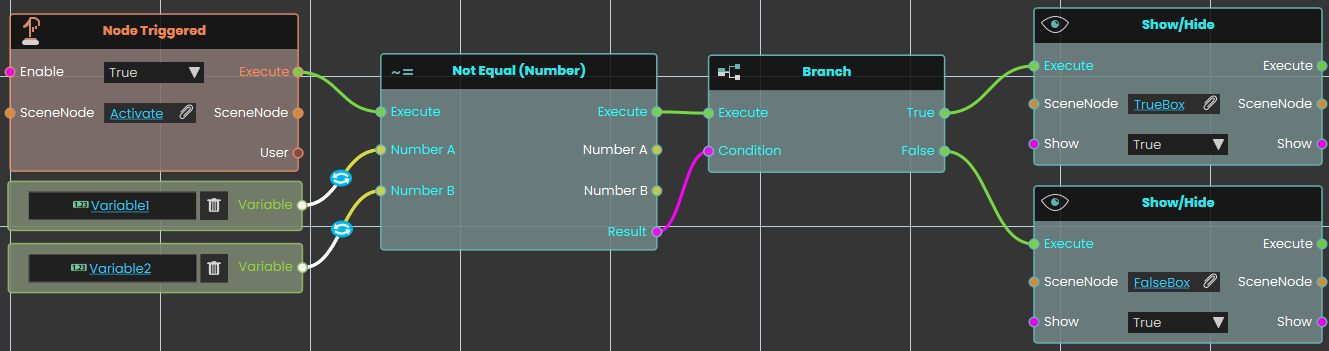
In this example, a Not Equal is used to compare the value of Variable1 with the value of Variable2 once the user triggers the object named Activate. The result of the comparison can be acquired through the Result port. We have connected this Result port to the Branch node, and if the result of the branch is True, the TrueBox will show; if the result is False, the FalseBox will show.
Data Types \ Number \ Conversion
 Number To String
The Number to String node enables the user to convert a numerical value to a string by either typing in a numerical value in the Number field or by attaching a value or a variable node to that port. Then once the conversion is executed, the resulting string can be acquired through the String port.
User \ Controller
 Attach To Hand

The Attach to Hand node enables the user to attach objects to specific parts of the hand in a VR environment by selecting the desired hand part. This node allows for precise placement of objects, such as tools or items, enhancing interactivity within the VR Experience. Once the attachment is configured, the object will remain in the chosen part of the hand during interactions.
Example

In this example, an Attach to Hand node is used to attach a syringe to the index finger once the "Hand Enter Node" event is triggered. The syringe is attached to the specified part of the hand automatically when the event occurs, enabling interaction with the object in the VR environment.
![]() Trigger Beam
Trigger Beam

The Trigger Beam node enables the user to control the visibility of a beam coming out of the controller in the VR Experience, once the node is executed.
Example

In this example, a Trigger Beam node is used to hide the beam coming out of the controller once the object named Activate is triggered. When the event is triggered, the change is reflected during the VR Experience.
User \ Transform
 Get User Rotation

The Get User Rotation response enables the user to get the values of the User's head rotation, and allows them to store the values of the Pitch, Yaw and Roll and the results can be acquired through their output ports.
Example

In this example, a Get User Rotation response is used to check the head rotation angles (Pitch, Yaw and Roll). Once the object named Activate is triggered, the head rotation values (Pitch, Yaw, Roll) of the user with attribute InBuilding and Value Yes are calculated and stored in the variables named Pitch, Yaw, Roll, in order to use them in the VR Experience.
 Teleport To Camera

The Teleport To Camera node enables the user to teleport to a new location by assigning a camera in the CameraNode field. Once the teleportation is executed, the user is moved to the position and orientation defined by the specified camera, the user can also decide whether this teleportation affect the host only or all the user in the experience (in case of collaboration).
Example

In this example, a Teleport To Camera response is used to move the user to a new location once the object named Activate is triggered. When triggered, the sound named Teleport_Sound will play, and the user will be teleported to the location of the camera assigned in the Teleport To Camera node.
 Attach User

The Attach User node allows users to attach the user to specific objects within the VR Experience. This node ensures that the user moves along with the object, providing an immersive experience where the user is fixed to the selected object throughout the VR environment, this can be decided to affect only the host or all user (in case of collaboration).
Example
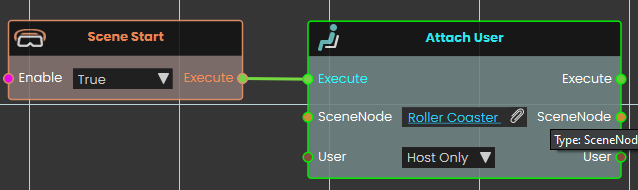
In this example, the Attach User node is used to attach the user to a roller coaster at the start of the scene. When the scene starts, the user will be fixed to the roller coaster, moving along with it as it travels through the environment, providing an immersive experience.
 Detach User

The Detach User node allows users to detach from an object within the VR Experience. This node provides a straightforward way to release the user from an object they were attached to, ensuring they regain control of their own movement and are no longer fixed to the selected object or location.
Example
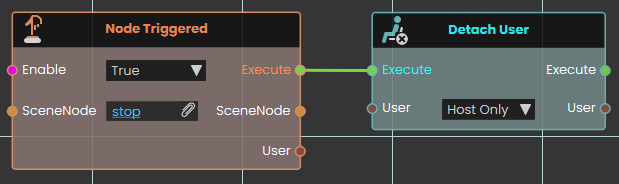
In this example, the Detach User node is used to detach the user from a roller coaster when the roller coaster's animation ends. Once the animation is complete, the user will be released from the roller coaster.
User \ Gadget
 Equip To User

The Equip to User Node enables the user to equip or unequip gadgets, adjacent objects, or HUD elements to the user within the VR environment. This node enhances interactivity by enabling users to interact directly with various items and interface elements as part of their virtual experience.
Example

In this example, the Equip to User Node is used to equip a gun controller to the user. Select the gun object, then assign it to the controller by clicking on the plus icon in the User Gadget window.

To activate the gun gadget, press the right grip button then the gun will be attached to the User's controller in the VR environment.
User \ Attributes \ String
 Set User Attribute (String)

The Set User Attribute response enables user to set a value to an attribute by either typing in a string value in the value field or by attaching a value or a variable node to that port. Then once the response is executed, the variable value can be acquired through the Value port.
Example

In this example, we added a String User Attribute called it Indoor with the value No

Once the user enters the object named Building, the Indoor attribute's value will be set to Yes, then when the object named Teleport Button is triggered, the user(s) with the attribute named Indoor and the value Yes will be teleported to the Outside CameraNode location.
User \ Point To Object
Point To Object

The Point To Node enables the user to be guided to the location of a specific place or object within the scene. When this node is activated, an arrow is displayed, pointing to the location of the assigned SceneNode within the VR environment.
Example

In this example, the Point To Node is used to guide the user to the location of an object named button when the Scene Start event occurs. As soon as the scene begins, an arrow appears, pointing directly to the button location, helping the user finding it within the VR environment.
User Name & ID
 Get User ID

The Get User ID node is used to retrieve the unique identifier of the user interacting within the VR environment. This ID can be utilized for various purposes, such as tracking user actions or customizing experiences based on the user.
Example

In this example, the Get User ID node is used to create a student attendance system. When the user triggers the Activate event, the "Get User ID" retrieves the Student ID number and stores it in the "attendance_ID" variable using the "Set Number Variable" node.
Note: To retrieve the User ID, the experience must be run from a logged-in account in SimLab VR Viewer.
![]() Get User Name
Get User Name

The Get User Name node is used to retrieve the name of the user interacting within the VR environment. This name can be utilized for various purposes, such as personalizing interactions or saving progress tied to a specific user.
Example

In this example, the "Get User Name" node is used to create a student attendance system. When the user triggers the Activate event, the "Get User Name" retrieves the student's name and stores it in the attendance_UserName variable using the "Set String Variable" node.
Note: To retrieve the User Name, the experience must be run from a logged-in account in SimLab VR Viewer.
Execution \ Branch
 Branch on Expression

The Branch on Expression response enables the user to evaluate an expression with the possible outputs of True or False each time the event connected to it is triggered. Once the response is executed, the result of the evaluation can be acquired through the True or False ports.
Example

In this example, a Branch on Expression response is used to evaluate an expression once the user triggers the object named Activate. The result of the expression, which will be either True or False, if the result was true, the object named "Variable_01" will be shown, if it was false, the object named "Variable_02" will be shown.
Execution
 Loop
Loop

The Loop node enables the user to repeatedly execute a connected response for a specified number of times as defined in the Number of Loops field. Each time the event connected to the loop is triggered, the response is executed repeatedly, and the loop continues until the assigned number of repetitions is completed.
Example

In this example, a Loop node is used to repeatedly execute the connected response that decreases the value of a number variable by one. The Decrement response is repeated for the number of times specified in the Number of Loops field, with the duration between each repetition set in the Interval field. Once the assigned number of repetitions is completed, the sound named Countdown_Over plays.
 Run Script

The Run Script node allows the user to execute advanced functions using the Lua programming language. This node provides flexibility by enabling custom scripts to be triggered when an event occurs. Allowing for complex operations and logic to be carried out as defined in the script. This node is ideal for scenarios requiring functionality beyond the standard nodes, offering advanced customization and control over the system.
You can read about Lua Scripting in SimLab Training builder through the following Blog:
Media
 Capture Picture
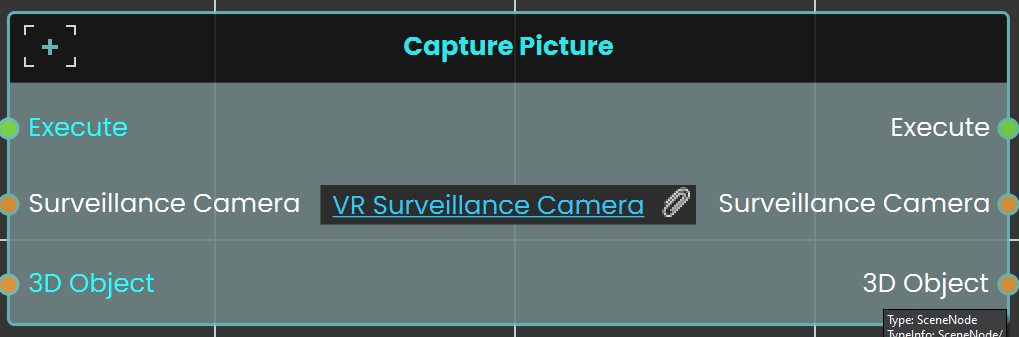
The Capture Picture node is used to capture an image from a camera within the scene, and the captured image can then be displayed on a 3D object within the scene. This allows the user to take snapshots and show them in the VR environment, such as displaying a captured image on a screen or other surface.
Example

A Surveillance Monitor is first created to display the captured images. This monitor is then attached to the VR camera.
In this example, the Capture Picture Node is used to capture an image on a picture frame model when the user triggers the Activate event. Before that, the Cast SceneNode is used to identify the picture frame as a 3D object, as the Capture Picture Node only works with 3D objects.
 Set Web Browser URL

The Set Web Browser URL node sets the URL for a web browser within the VR Experience. This node enables users to open and navigate to a specified webpage, making it possible to display web content like videos or instructional resources directly within the VR environment.
Example
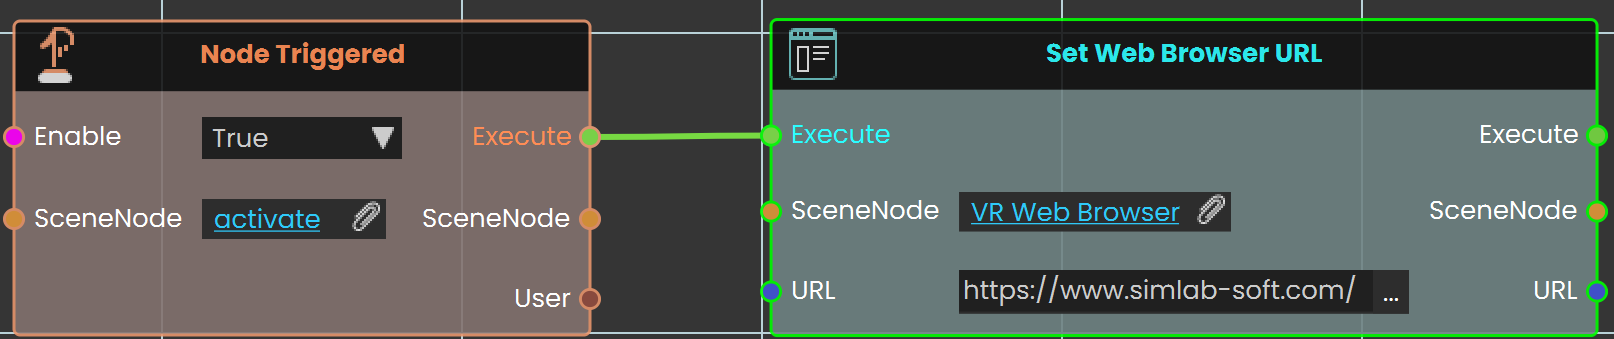

In this example, the Set Web Browser URL node is used to open the SimLab website. The Node Triggered event is activated when the user triggers an object named "activate." As soon as the object is triggered, the Set Web Browser URL node is triggered, setting the URL to the SimLab website. The website then loads and is displayed on a web browser plane within the VR environment.
SceneNode \ Nodes Management
 Cast SceneNode

The Cast SceneNode enables the user to change the type of a SceneNode by selecting a typeInfo from the list, such as sound, 3D object, video, gadget, or camera. This node identifies the assigned SceneNode as the chosen type, allowing it to function accordingly within the VR environment.
Example

In this example, Animals sounds are assigned to the animals as SceneNode type

A Cast SceneNode is used to identify the SceneNode of an animal object (dog, cat, and horse) as a sound. An attribute named "Sound" is added to all three animals, and the corresponding sound is assigned to each. When the user triggers the animal SceneNode, the Cast SceneNode plays the sound assigned in the attribute.
 Get Node Children
The Get Node Children enables the user to retrieve child SceneNodes from a specified parent node within the hierarchy in the scene browser. This function allows users to access the children of a parent node in the VR environment, facilitating more complex interactions and hierarchies.
Example
In this example, the Get Node Children enables the user to retrieve the child of a group named "Ball Parent" on the Trigger event. When the user triggers the Activate object, the Get Node Children retrieves the child node, and the Get Node Attribute (String) is used to acquire the child’s attribute.
 Reset Parent Node
The Reset Parent Node enables the user to reset all transformations applied to an object and return it to its original position relative to its main parent. This can be done by linking the node to an event or condition within the scene. Once the reset is executed, the object will revert to its default state under the main parent.
Example
In this example, a Reset Parent Node is used to reset the transformations of a car object to its original state relative to its main parent once the "Car Move" sequence ends. When the user triggers the Activate object, the car move animation sequence will play. After the sequence concludes, the Reset Parent Node is triggered automatically, returning the car to its default position under the main parent.
 Set Node Collision Enabled
The Set Node Collision Enabled node is used to enable or disable collision for the user. This can be utilized to allow the user to pass through objects or be blocked by them within the VR environment.
Example
In this example, the Set Node Collision Enabled node is used to disable collision for the user when the scene starts. The wall is assigned as the target object, and the collision is set to "False," allowing the user to pass through it.
Delete SceneNode
The Delete SceneNode node enables users to remove a specified object from the scene during a VR Experience. This node allows for dynamic scene modifications by deleting objects based on interactions or conditions, making the environment more interactive and adaptable. Once executed, the specified object is permanently removed from the scene.
Example

In this example, the Delete SceneNode node is used to remove a trigger box from the scene. The Node Triggered event is activated when the user triggers or clicks on an object named "Remove." As soon as the object is triggered, the Delete SceneNode node removes the trigger box from the scene, preventing further interactions with it.
SceneNode \ Transform \ Location
 Get Node Location

The Get Node Location response enables the user to obtain the X, Y, and Z coordinates of an object's location each time the event connected to it is triggered. Once the response is executed, the coordinates can be acquired through the X, Y, and Z ports.
Example

In this example, a Get Node Location response is used to obtain the X, Y, and Z coordinates of an object named Table once the user triggers the object named Activate. The coordinates are then stored in variables named X, Y, and Z, which can be connected to a variable writer to be displayed during the VR Experience.
 Set Node Location

The Set Node Location response enables the user to set the location of an object to specific X, Y, and Z coordinates by either typing in the numerical values or by attaching a variable node to those ports. Once the response is executed, the object's new location is applied using the provided coordinates.
Example

In this example, a Set Node Location response is used to assign the X, Y, and Z coordinates stored in variables named X, Y, and Z to an object named Pot once the user triggers the object named Activate. The object's new location is set based on these coordinates, allowing the updated position to be reflected during the VR Experience.
External Connection \ WebSocket
 Open External Connection
SimLab Composer 14 introduces WebSocket support, enabling seamless integration with external systems allowing it to work with external hardware, co-simulation engines, and websites, unlocking numerous possibilities.
The WebSocket nodes (Open External Connection, Send Message, and On Message Received) are exclusively available in the Ultimate Edition.
The Open External Connection node enables the opening of a WebSocket connection to an external system. When the Auto Handle Lua is set to true, incoming messages containing Lua scripts will be automatically executed. This allows for real-time interaction between SimLab Composer and external systems, such as co-simulation engines or hardware, with the ability to dynamically execute Lua code as part of the interaction.

Input Ports:
- Execute
- URL: WebSocket URL that includes the server IP address, port, channel (optional). Example: ws://server1.simlab-soft.com:8765/robots_1
- Auto Handle Lua: Incoming messages containing Lua scripts will automatically execute those scripts If enabled (True).
Output Ports:
- Execute
- URL
- Auto Handle Lua
 Send Message Node
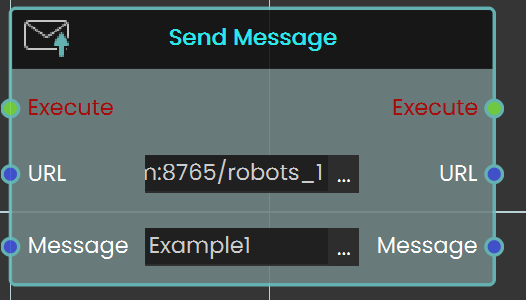
The Send Message node allows you to communicate with the WebSocket server by sending messages. It is essential to ensure that the message format follows the protocol that the server and other clients can process. This node enables real-time interaction with external systems, making it possible to transmit data or commands to connected servers or clients.
Input Ports:
- Executive
- URL: WebSocket URL that includes the server IP address, port, and channel (optional). Example: ws://server1.simlab-soft.com:8765/robots_1
- Message
Output Ports:
- Execute
- URL
- Message
External Connection \ Cloud
 Get Cloud Attribute

The Get Cloud Attribute node enables the user to retrieve saved progress for a specific VR Experience by assigning the attribute in the Attribute Name field. The progress can be saved for either the scene, the user, or both. Once the node is executed, the retrieved value can be acquired through the Result port.
Example

In this example, a Get Cloud Attribute node is used to retrieve stored data from Cloud. When the user enters the object named FinishLine, the object named Scoreboard will be shown. The data saved for this specific scene for all users is retrieved and stored in a variable named Scoreboard, which can then be displayed during the VR Experience.
Set Cloud Attribute

The Set Cloud Attribute node enables the user to store data for a specific VR Experience by assigning the attribute in the Attribute Name field then set the value of it. the data can be stored for either the user, the scene, or both. Once the node is executed, the specified data is saved accordingly.
Example

In this example, a Set Cloud Attribute node is used to store data in Cloud. When the user enters the object named FinishLine, the value of the variable Time will be converted to String and stored under the attribute named Time for the Scene Only, meanwhile the value of the variable Coins_Count will be converted to String and then stored under the attribute Score for the User Only.
Note: To retrieve the Cloud data, the experience must be run from a logged-in account in SimLab VR Viewer.
Scene
 Load Scene
The Load Scene node is used to teleport between different scenes within your VR Experience. Enhancing the overall immersion and interactivity of the experience.
Example
In this example, the Load Scene Node is used to transition the user from one scene to another. This node facilitates changing scenes, allowing for a dynamic experience as users navigate through different environments within the VR application.
 Home Scene
The Home Scene node enables users to return to the initial scene of the VR Experience. This node provides a straightforward way for users to reset the VR Experience to the starting point, ensuring a user-friendly navigation experience.
Example
In this example, the Home Scene Node is used to return the user to the main scene when the trigger event occurs. This allows you to teleport back to the primary environment, enhancing the user experience by providing a clear and intuitive way to return to the starting point.
 Import Scene
The Import Scene node is used to load an external scene into the current VR Experience. This allows users to dynamically bring in additional environments, objects, or elements as needed during runtime.
Example
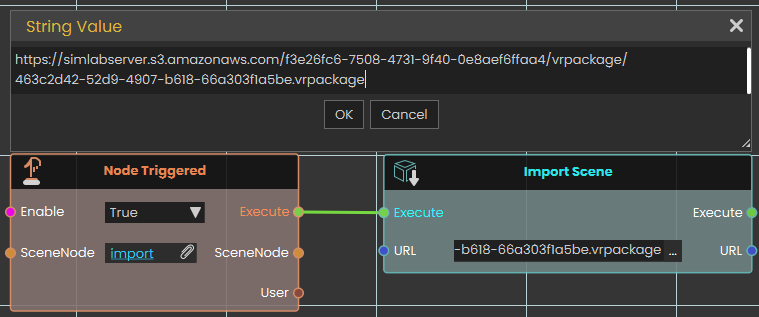
In this example, the Import Scene node is used to load a car model into the scene when the "Import" object is triggered. The Node Triggered event detects user interaction and executes the Import Scene node, which then loads the specified car model from an external VR package file. This allows the car to appear dynamically within the VR environment.
Media \ Variable Writer \
Color:

The Set / Get Variable Writer Color nodes are used to control the color of the text displayed by a Variable Writer in the VR environment. The Set node allows you to change the text color dynamically based on events or conditions, while the Get node retrieves the current color of the Variable Writer. This is useful for customizing the visual appearance of displayed values, such as indicating status or drawing attention to changes.
Get/Set Variable Writer Prefix:
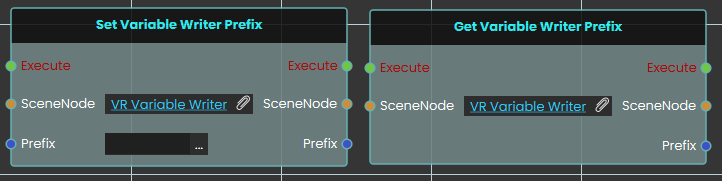
The Set / Get Variable Writer Prefix nodes are used to modify or retrieve the prefix text displayed before the variable value in a Variable Writer. The Set node allows you to add custom text before the value, such as labels or units, while the Get node retrieves the current prefix. This helps provide context to the displayed value, making it clearer for the user.
Get/Set Variable Writer Suffix:
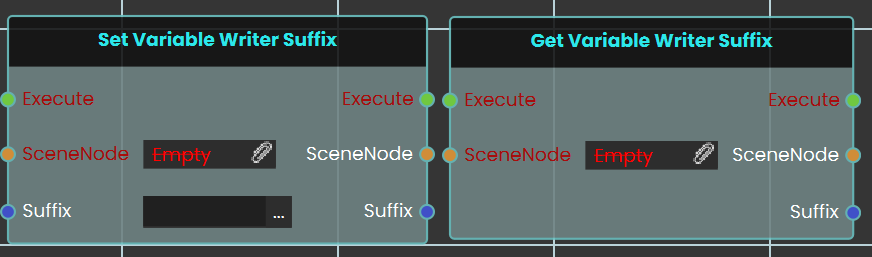
The Set / Get Variable Writer Suffix nodes are used to modify or retrieve the suffix text displayed after the variable value in a Variable Writer. The Set node allows you to add custom text after the value, while the Get node retrieves the current suffix. This helps make the displayed value more informative and user-friendly.
Set Variable Writer Variable:

The Set Variable Writer Variable node is used to assign or change the variable displayed by an existing Variable Writer. This allows you to update the displayed content dynamically during the VR experience by switching the linked variable at any time.