CAD/VR to Pico
Learn all the techniques for creating and sharing VR into the Pico VR devices
- Introduction
- Transfer Your 3D/CAD into Pico VR Devices
- Create Interactive VR Experiences for Pico VR Devices
- How to Pair your Pico VR Device with your SimLab Account
- SketchUp to Pico VR
- Rhino to Pico VR
- Sharing the VR Experience with others
- Enhance The Quality of The VR Experience
Introduction
In this book we are going to learn all the techniques for sharing 3D/CAD models into Pico VR devices and creating interactive VR Experiences for it.
There are several ways to create and share your own VR Experiences for the Pico VR devices. In this document we are going to discuss following topics:
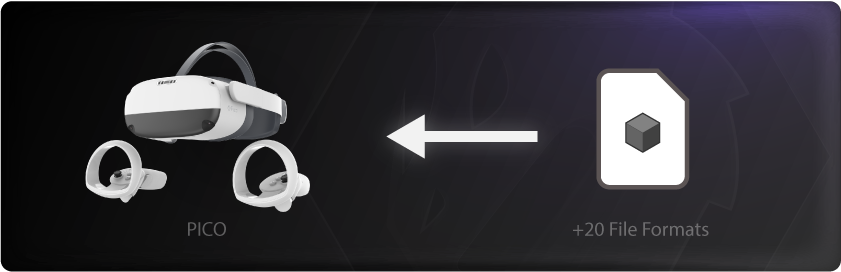
 Transfer any 3D/CAD model to Pico VR Devices

This method is fast, reliable, and super easy for sharing models from different file formats into Pico VR devices, We will use SimLab VR Studio to read any 3D/CAD model and in few clicks it can be on your Pico VR device.
 Create interactive VR Experiences for Pico VR Devices

Create all types of 3D VR Experiences without any coding. create VR visualization, interactive VR Experiences, VR training series and much more..
 Share models directly from SketchUp into Pico VR Devices

One click to share any SketchUp scene into the Pico VR device directly.
 Share models directly from Rhino into Pico VR Devices
One click to share any Rhino scene into the Pico VR device directly.
 Share Your VR Experiences with others

You can use SimLab VR Viewer to share your scenes with your colleagues, clients, and others
 Enhance the Quality of Your VR Experiences

Different settings and features are available to enhance the quality and the performance of your VR Experiences.
Transfer Your 3D/CAD into Pico VR Devices
If you have a 3D model, a 3D scene, or a CAD design and want to run it and examine it in VR, you can easily transfer it and run it on Pico VR devices using SimLab Soft technology.
Follow these steps to transfer any 3D file you have into your Pico VR devices:
The 3D model used in this example can be found here. Download Link
First: Go to your desktop (windows or macOS).
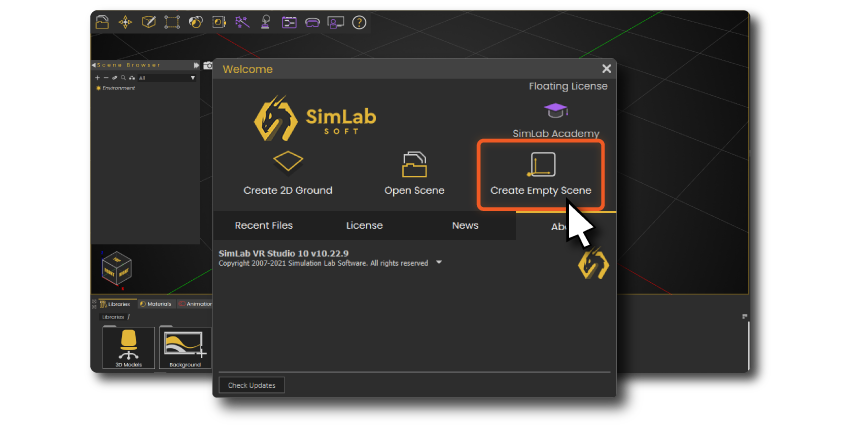
1- Download and Install SimLab VR Studio, then open it.
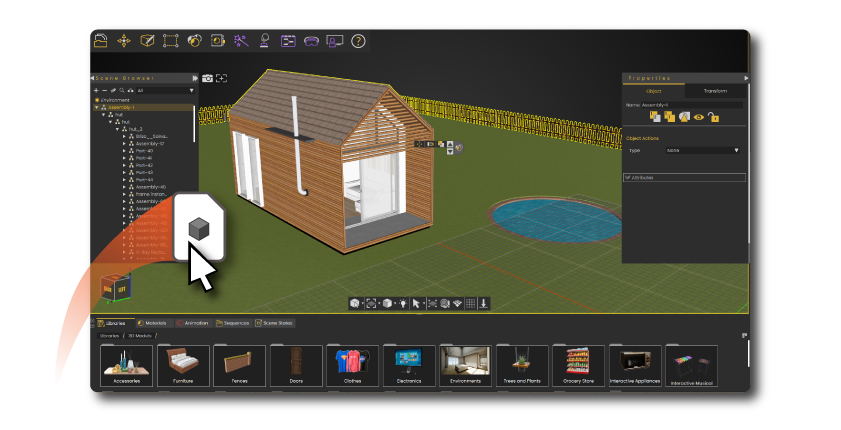
2- Drag and drop your 3D/CAD model(s) into the scene.
You can import pretty much all industry standards 3D/CAD file formats, check the full supported file formats list here.
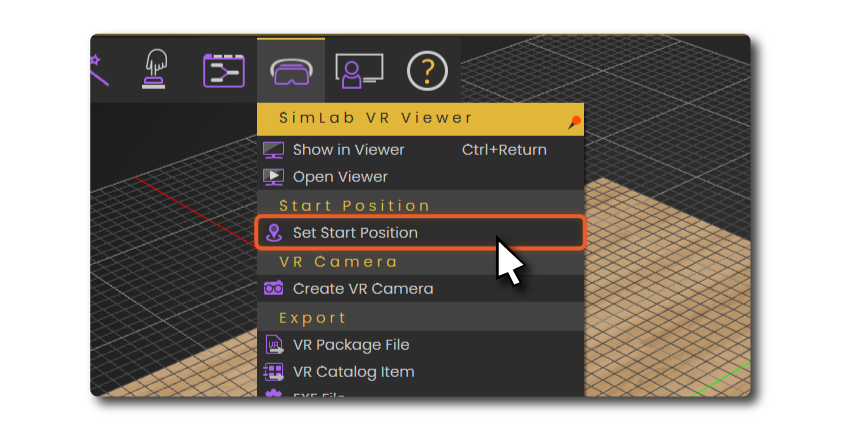
3- Define the starting position of the VR Experience.
The start position defines the location where the viewer is going to start the experience. you can position it wherever you want.
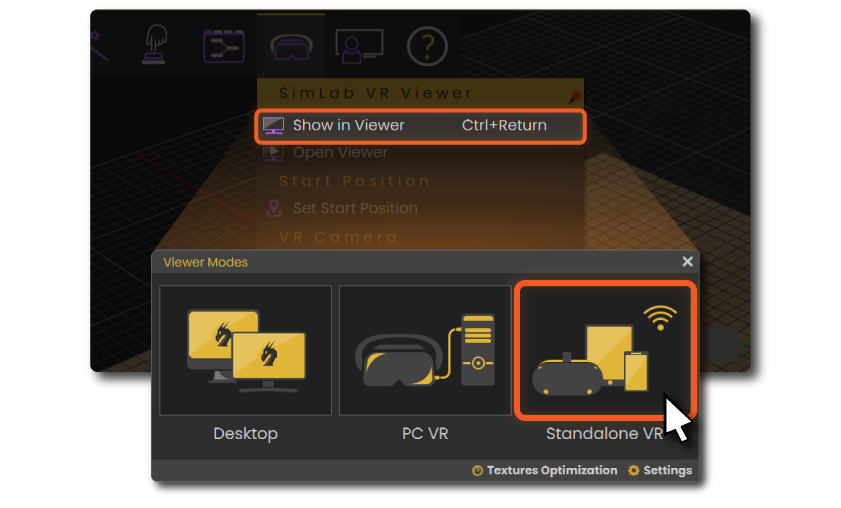
You can test the VR scene before sharing it to the Pico VR device on desktop.
Go to VR Viewer > Show in Viewer > Desktop.
You need to sign in to an active SimLab account if you are not already.
Fill out the information then click on Upload to My Account.
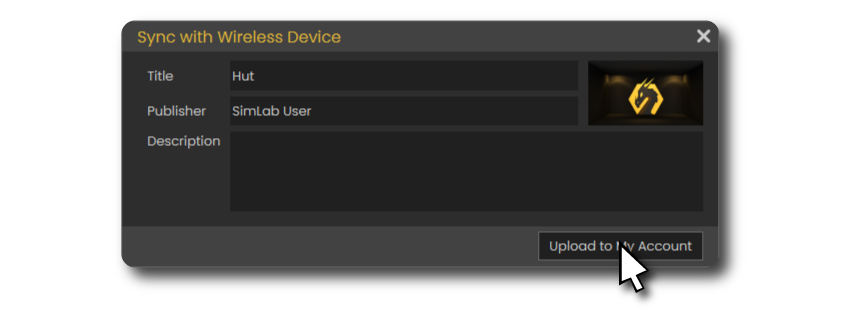
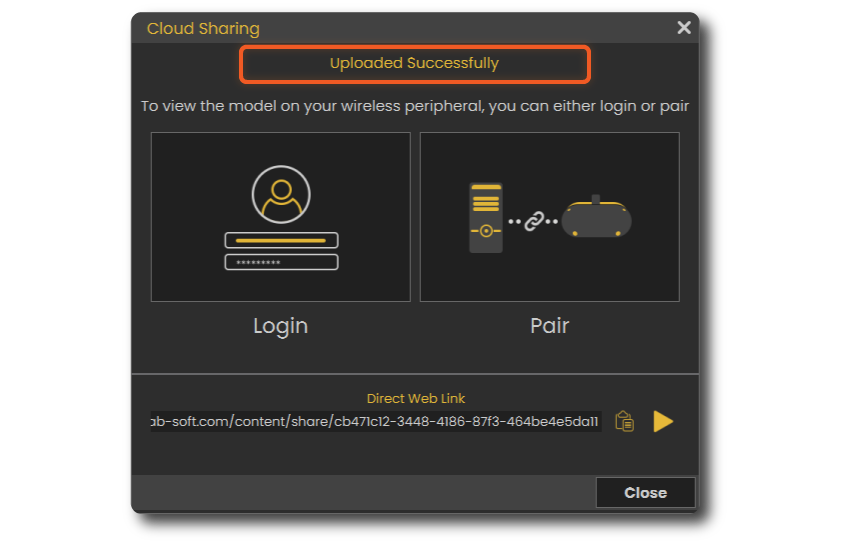
It will take few moments then it should say that its Uploaded Successfully.
You can learn how to enhance the quality by enabling shadows on the Pico VR device here.
Second: Go to your Pico VR device.
Now the VR scene is uploaded and synced to your SimLab account, open Pico device, login to the account to access the VR experience.
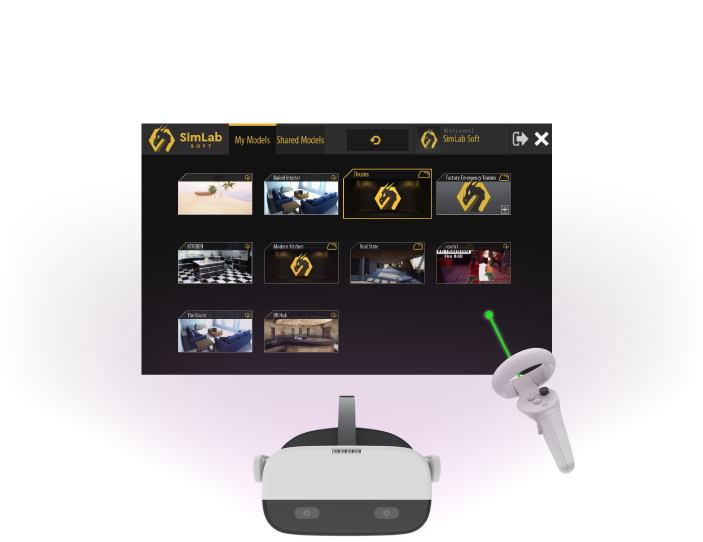
1- Download SimLab VR Viewer for Pico VR Devices.
2- Open the app, then sign in to your SimLab account.
3- You will find the VR Experience under My Models tab.
Create Interactive VR Experiences for Pico VR Devices

Other than just sharing your models as they are to Pico VR devices to view them, you can do more by creating interactive VR experiences, quizzes and training sessions easily with SimLab VR Studio.
Learn how to create interactive VR Experiences using SimLab VR Studio from here:
> Creating your first VR Experience, Step by Step
Then you can share any scene you create with SimLab VR Studio following these steps:
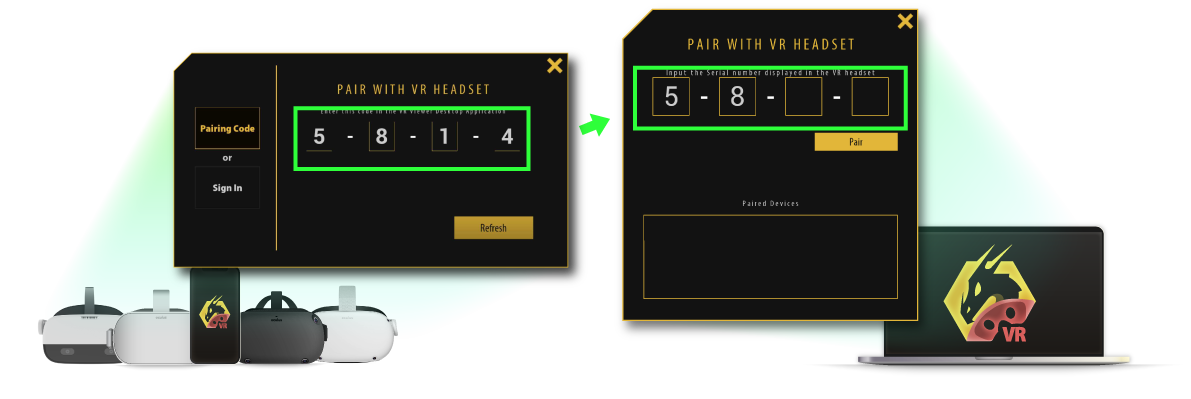
How to Pair your Pico VR Device with your SimLab Account
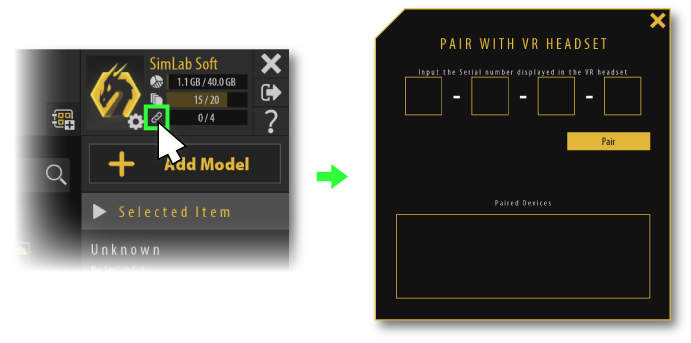
Pico VR devices can be paired to a SimLab account so it becomes so easy to transfer and sync VR models to them, after pairing all of the uploads and modifications on SimLab cloud will be automatically be synced and transferred to all of your paired devices.
Pairing Steps
- Open SimLab VR Viewer on your desktop (windows or macOS) then sign in to your SimLab account.

- Click on the Pairing Button to open the pairing dialog.

- Open SimLab VR Viewer on your Pico VR device.

- Click sign in button and choose pairing. (or you can sign in normally to your account and skip all the following steps)

- Insert the pairing code that shows on your device into your PC.

- Click pair, then the device should appear on the pairing devices list, you can rename it or delete it from this list as well.

- After that, click refresh button on your device, then all of the uploaded models will be loaded.


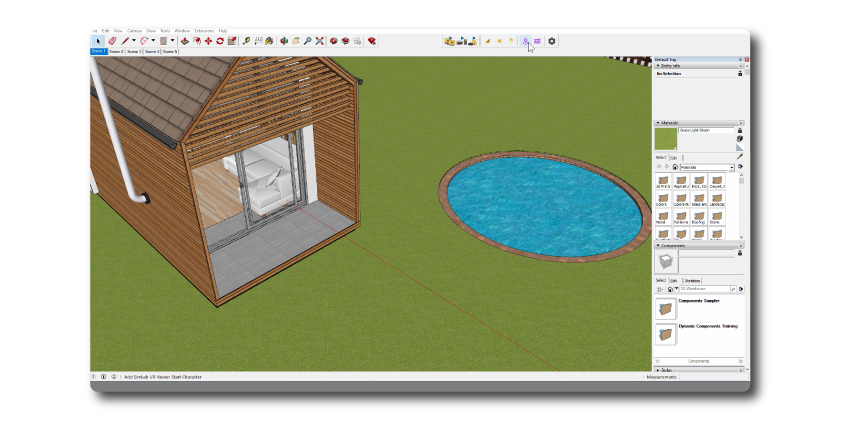
SketchUp to Pico VR

In the following steps we are going to learn how to share our designs directly from SketchUp into Pico VR device.
We are going to use SimLab VR Plugin for SketchUp to do that.
Download and setup the Extension
- Go to SimLab VR Plugin for SketchUp, then download the plugin on your desktop (windows or macOS).
- Open SketchUp.
- Activate the plugin Toolbar by going to Extensions > SimLab VR Plugin > Show Toolbar.


Sharing Models
- Open your model on SketchUp.

The 3D model used in this example can be found here. Download Link
- Click on Sync with Wireless Device.

- Fill out the information then click on Upload to My Account.

It will take few moments then it should say that its Uploaded Successfully.


Advanced VR Creation
If you want to create interactive VR Experiences with better environments, visual effects, use different 3D file types, create training sessions, quizzes and more. You can use SimLab VR Studio, Learn more.
You can learn how to enhance the quality by enabling shadows on the Pico VR here.
Rhino to Pico VR
In the following steps we are going to learn how to share our designs directly from Rhino into Pico VR device.
We are going to use SimLab VR Plugin for Rhino to do that.
Download and setup the Extension
- Go to SimLab VR Plugin for Rhino, then download the plugin on your desktop (windows or macOS).
- Open Rhino.
- On the ribbon then Right Click > Show Toolbar > SimLab VR.


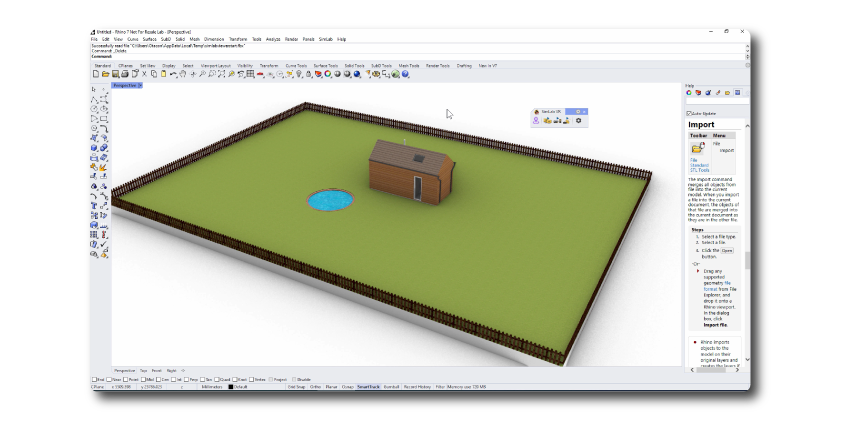
Sharing Models
- Open your model on Rhino.

The 3D model used in this example can be found here. Download Link
- Click on Sync with Wireless Device.

- Fill out the information then click on Upload to My Account.
It will take few moments then it should say that its Uploaded Successfully.
Advanced VR Creation
If you want to create interactive VR Experiences with better environments, visual effects, use different 3D file types, create training sessions, quizzes and more. You can use SimLab VR Studio, Learn more.
You can learn how to enhance the quality by enabling shadows on the Pico VR here.
Sharing the VR Experience with others
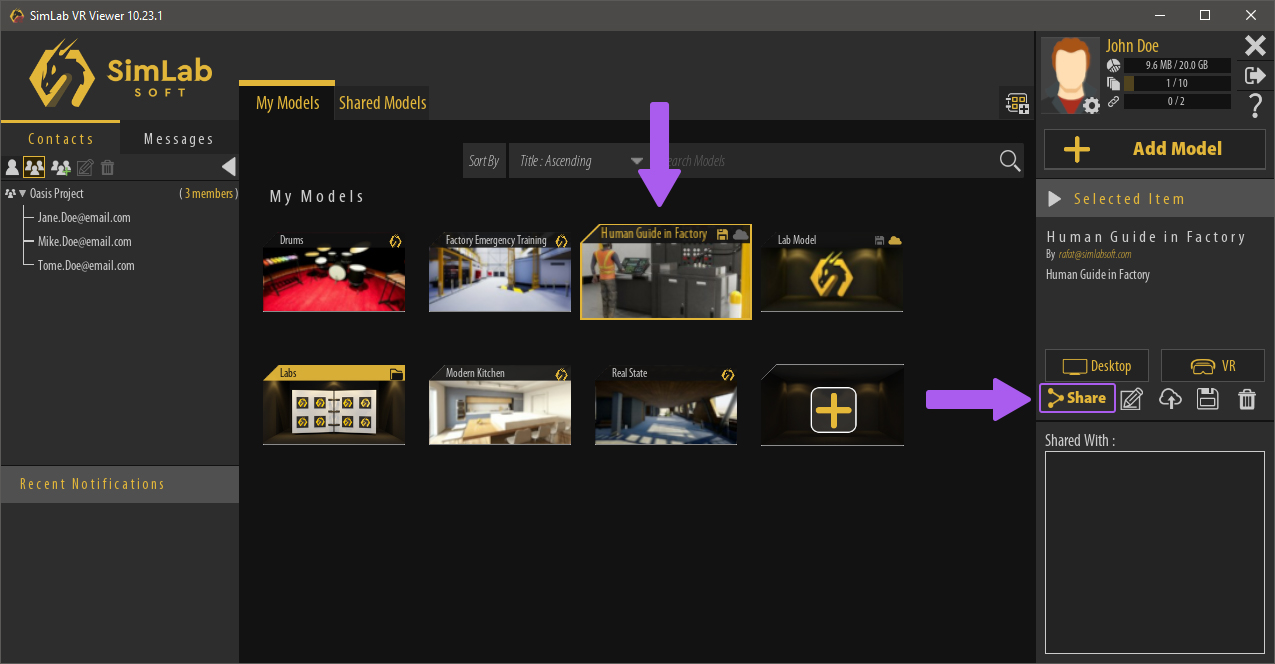
In order to manage your VR Experiences, add contacts, contact them and share your VR Experiences, you need to use the desktop version (windows and macOS) of SimLab VR Viewer.

Adding Contacts
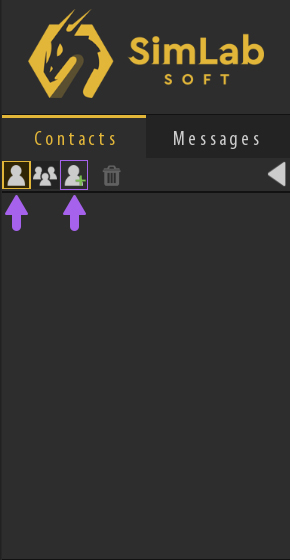
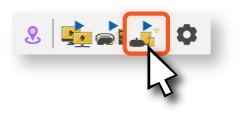
To Add Contacts, in the Contacts panel to the left make sure that the Contacts List is toggled on, then click on the "Add Contact" Icon.
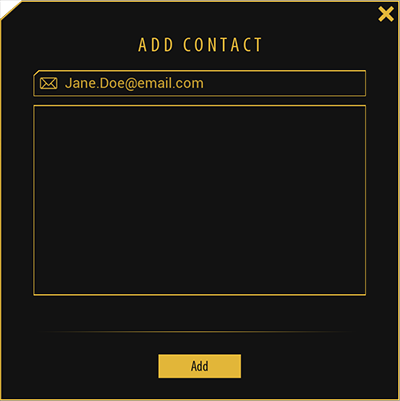
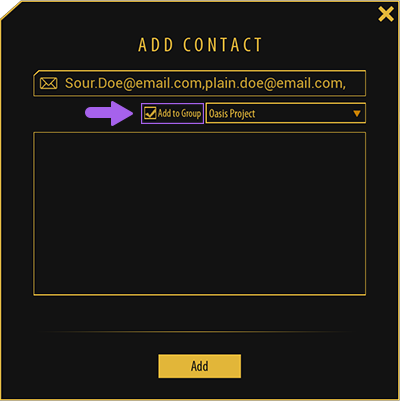
In the "Add Contact" dialogue, type the email address of the user you want to add as a contact to your list, then click on the Add button.
Note : You can add multiple contacts at the same time by separating their email addresses with a "comma" in the email field.
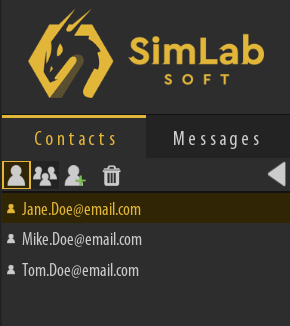
Added contacts will be displayed in the "Contacts" list as email addresses if they do not have an active SimLab Account.
Once they activate their account, their names will be displayed instead of email addresses.
Note : An email will automatically be sent to the contacts you add, inviting them to activate their SimLab cloud account in case they do not have an existing account.
Creating Groups
To manage contacts more efficiently, you can assign them to groups in order to easily share VR Experiences with them.
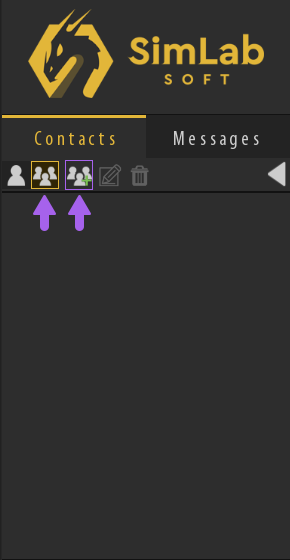
To create a Group, in the Contacts panel to the left make sure that the Groups List is toggled on, then click on the "Add Group" Icon.
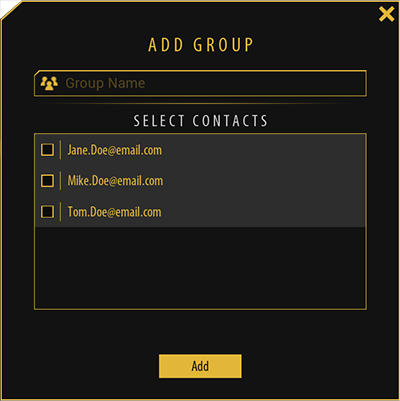
In the Add Group dialogue, type in a name for the group then select the contacts that wish to add to that group.

Once the group is created, you will find it when toggling the Groups list view in the contacts panel.
Adding Multiple Users to a Group
After creating a group you will be able to add multiple contacts to that group, to do so, toggle on the Contacts List then click on the Add Contacts icon.
In the Add Contacts dialogue, enable the "Add to Group" option and select the desired group, and in the email field, type or paste the email addresses separated by a "Comma", then click Add.
Sharing VR Experiences
Now that you have learned how to add contacts and groups, you can now Share VR Experiences with other users.
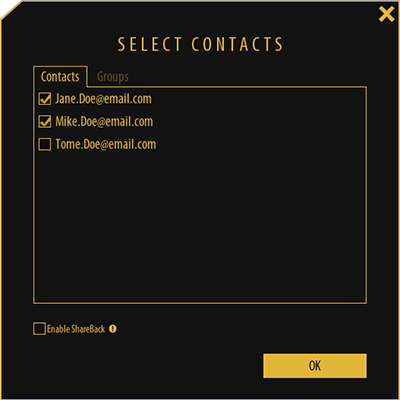
ShareBack
Watch This Video To learn more About Sharing and using ShareBack.
Messages
SimLab VR Viewer allows you to send and receive messages from contacts through the Messages Tab in the panel to the left.
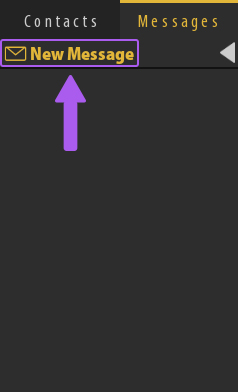
To send a message, Switch to the messages Tab and Click on "New Message".
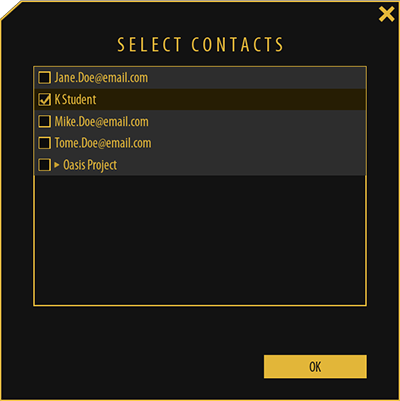
From Select Contacts dialog, select the contacts you wish to send a message to, and click "OK".
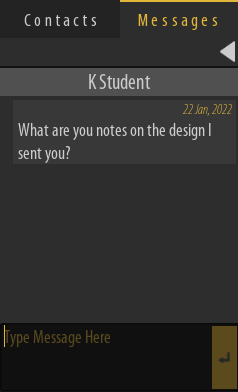
Once you have selected a contact, you can now message him by typing in the text field at the bottom then click "Send" or by pressing "Enter" on the keyboard.
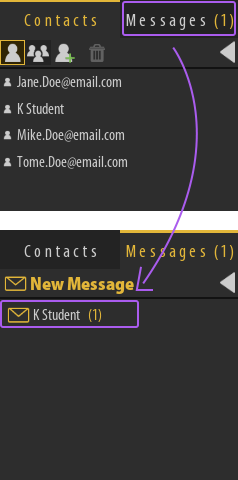
When you receive a message a notifications with the number of received messages will appear next to the Messages tab title.
Switch to the messages tab and you will find the active messaging sessions with the number of messages next to it, click it to view the received messages
Enhance The Quality of The VR Experience
There are various ways to enhance VR Experience quality and performance. Here are some of them:
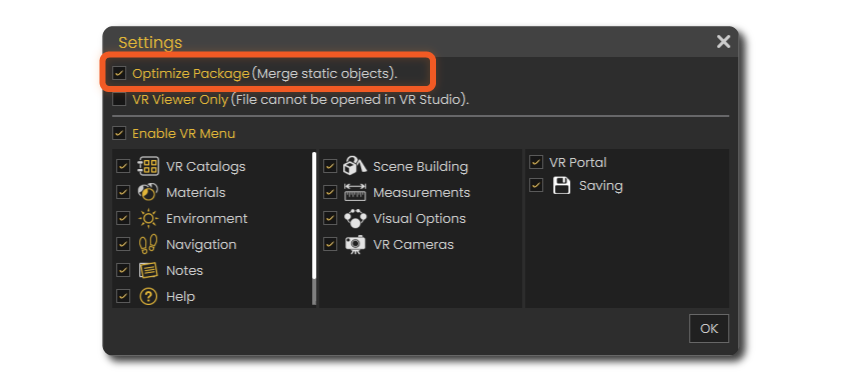
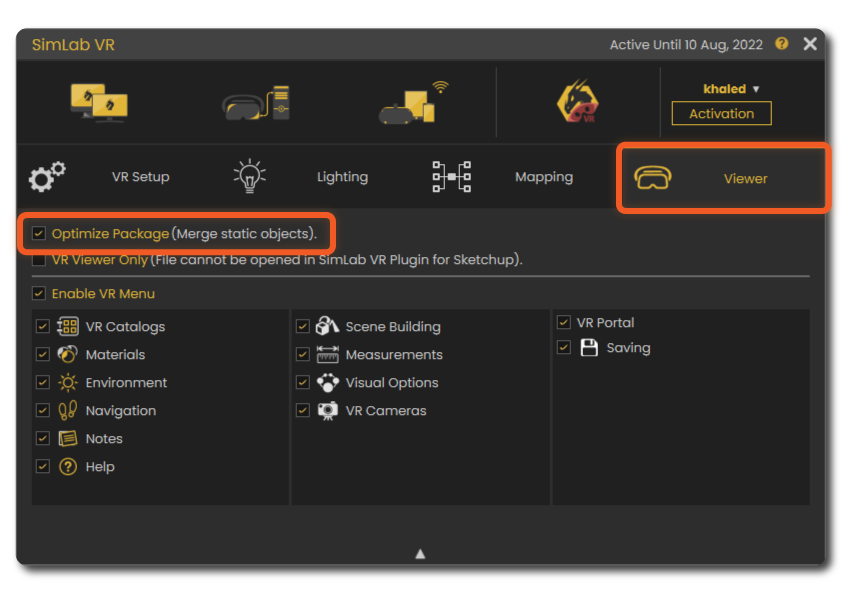
Optimizing VR Packages
You can just tick this option in the VR settings and the Geometry of the scene will be enhanced upon export very efficiently giving much smoother and lighter experience without loosing any of the details.
This option is available in both SimLab VR Studio and SimLab VR Plugins for SketchUp and Rhino.
SimLab VR Studio
- Go to VR Viewer > Show in Viewer > Settings

- Check Optimize Package.


SimLab VR Plugins for SketchUp and Rhino
Scene Optimization
This option is available in SimLab VR Studio under the file menu.
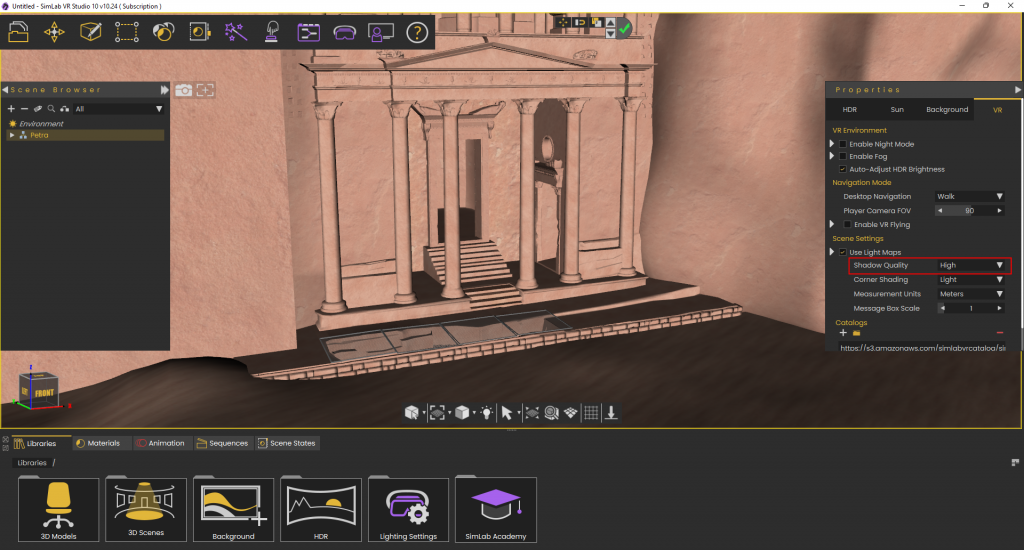
Shadows Enable/Disable
Shadows can improve visual appearance of 3D models significantly. On low end devices likes Quest (Stand alone), Pico, Android, and iOS, shadow calculation can reduce responsivity of the device, which may affect the quality of the VR Experience. That is why shadows are turned off by default on those devices to give the user the ability to run larger VR Experiences.
If the user decides that the experience is small and should run fine with shadows on those devices, it can be enabled by setting shadow quality in the VR properties.
This option is available in both SimLab VR Studio and SimLab VR Plugins for SketchUp and Rhino.
SimLab VR Studio
SimLab VR Plugins for SketchUp and Rhino

Note: To have shadows working, make sure to install the latest viewer on your device from the free VR Viewer page
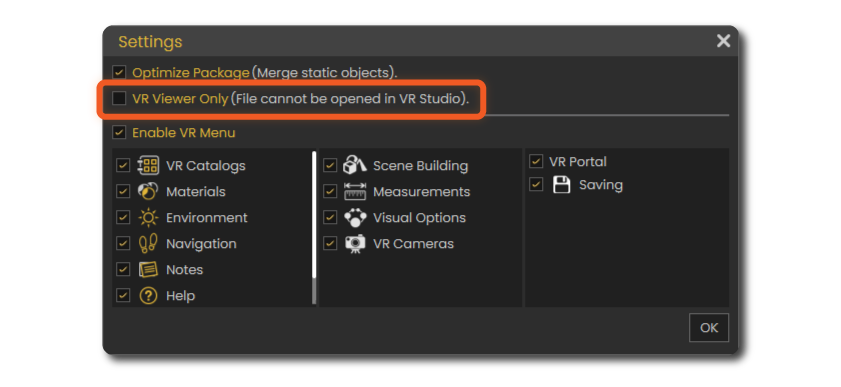
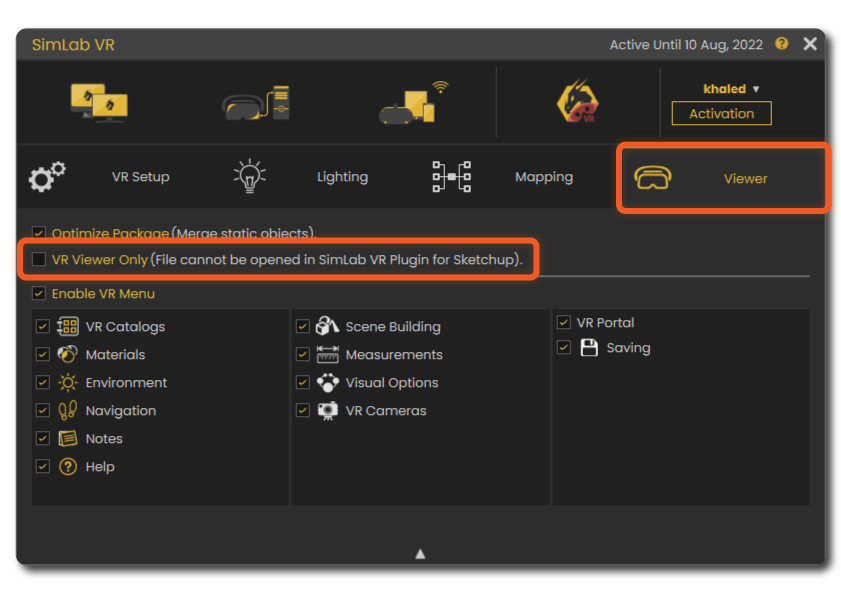
Disabling Editing Capabilities (View Only)
Make your Experiences View Only so no one can edit them or read them on SimLab VR Studio.
This option is available in both SimLab VR Studio and SimLab VR Plugins for SketchUp and Rhino.
SimLab VR Studio
- Go to VR Viewer > Show in Viewer > Settings
- Check VR Viewer Only.

SimLab VR Plugins for SketchUp and Rhino
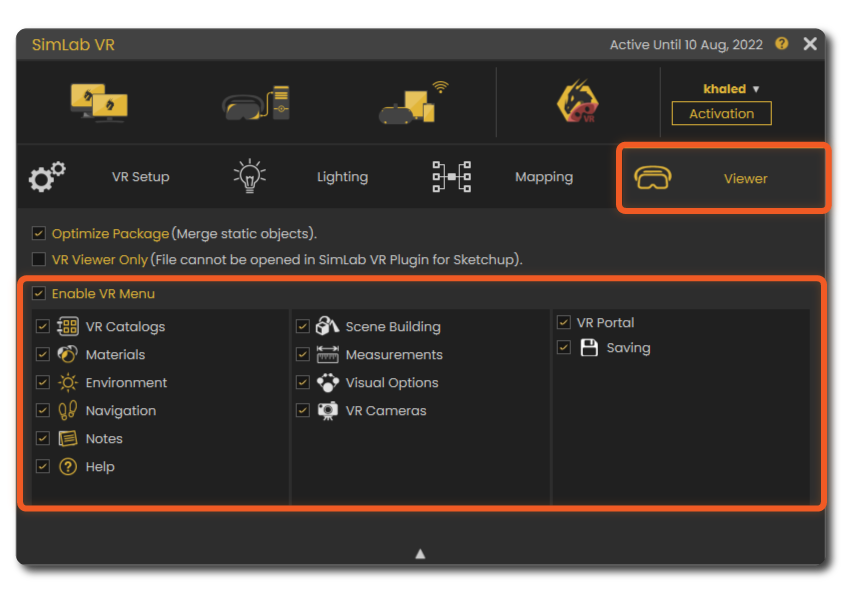
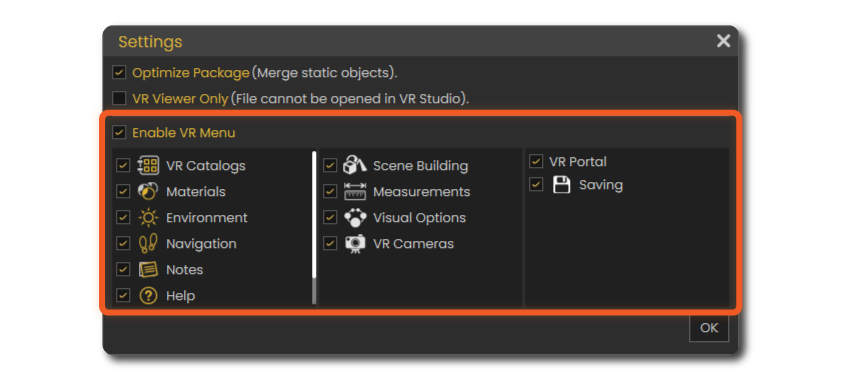
Disabling Items in the VR Menu
Control what to enable or disable in the VR Viewer menu for your clients.
This option is available in both SimLab VR Studio and SimLab VR Plugins for SketchUp and Rhino.
SimLab VR Studio
- Go to VR Viewer > Show in Viewer > Settings
- Check and uncheck what you want to disable or enable in the VR menu.

SimLab VR Plugins for SketchUp and Rhino